The Unseen Heroes: Why Automated System Recovery Isn’t Optional Anymore

In today’s digital world, our lives and businesses run on a vast, intricate web of interconnected systems. Think about it: from your morning coffee order to global financial transactions, everything relies on distributed systems working seamlessly. But here’s a truth often whispered in server rooms: these complex systems, by their very nature, are destined to encounter glitches. Failures aren’t just possibilities; they’re an inevitable part of the landscape, like that one sock that always disappears in the laundry. 😀

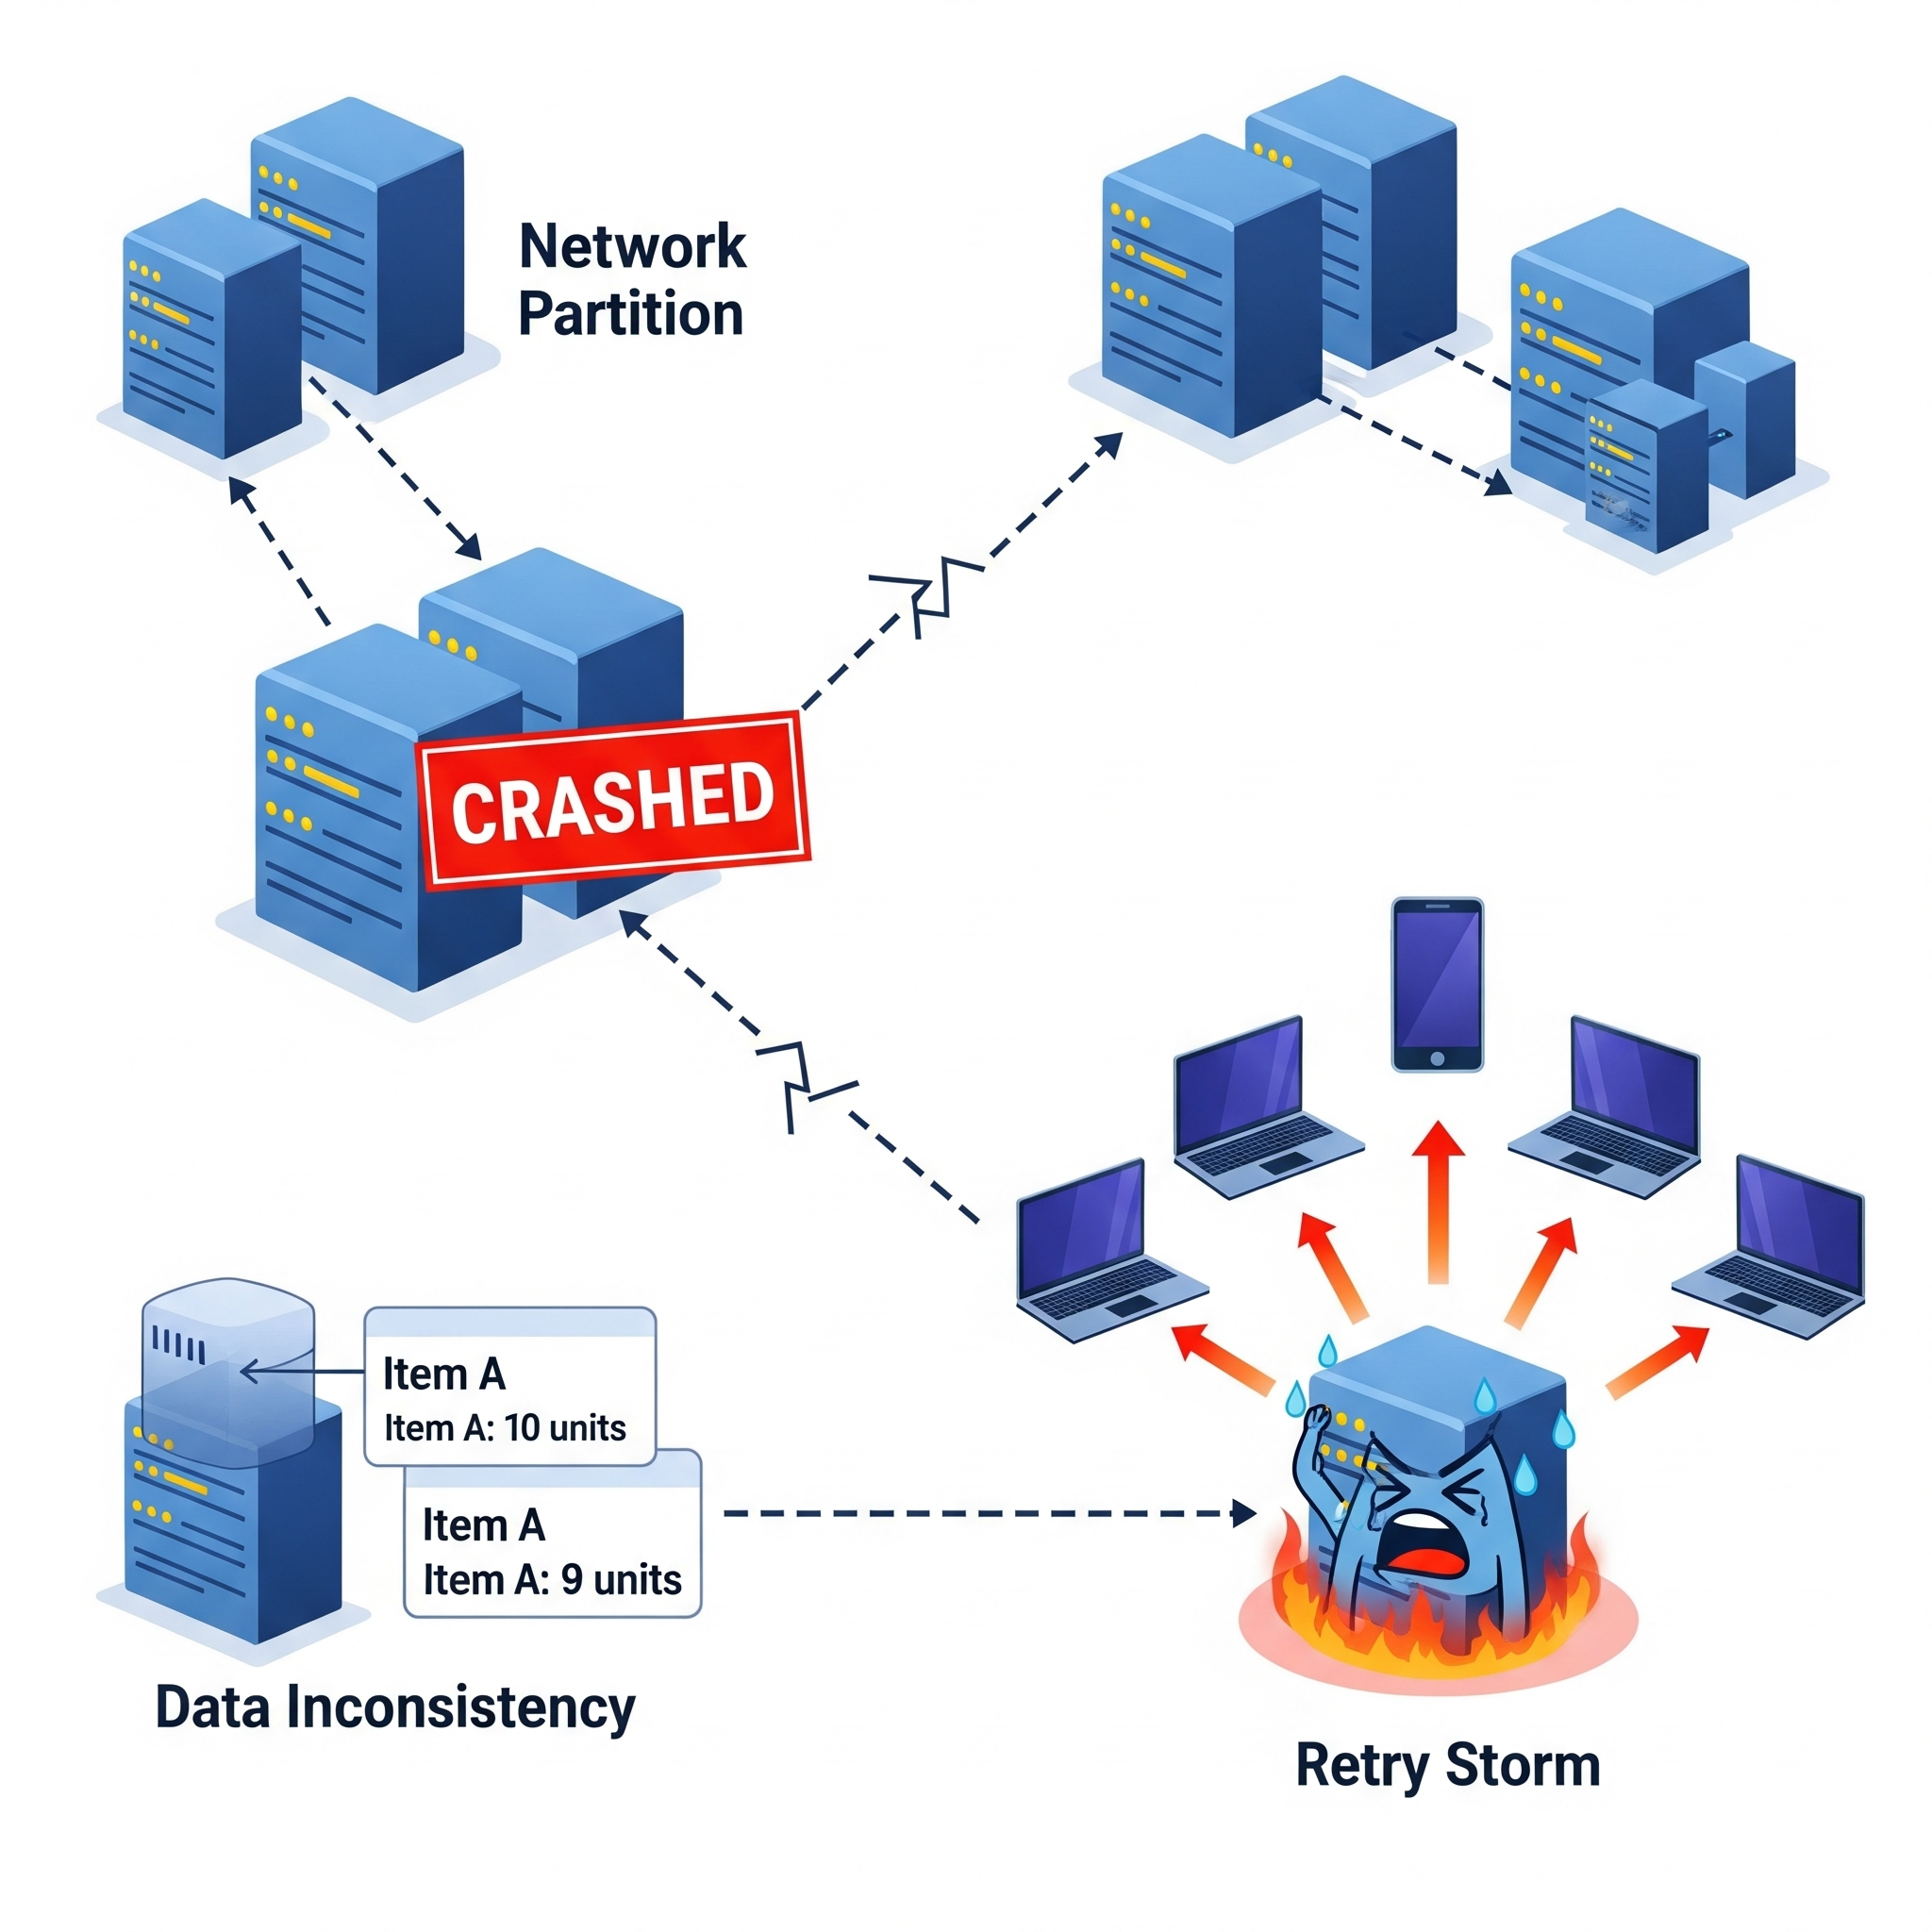
We’re talking about everything from a single server deciding to take an unexpected nap (a “node crash”) to entire communication lines going silent, splitting your system into isolated islands (a “network partition”). Sometimes, messages just vanish into the ether, or different parts of your system end up with conflicting information, leading to messy “data inconsistencies”.

It’s like everyone in the office has a different version of the same meeting notes, and nobody knows which is right. Even seemingly minor issues, like a service briefly winking out, can trigger a domino effect, turning a small hiccup into a full-blown “retry storm” as clients desperately try to reconnect, overwhelming the very system they’re trying to reach. Imagine everyone hitting refresh on a website at the exact same time because it briefly went down. Isn’t this the digital equivalent of a stampede.

This isn’t just about fixing things when they break. It’s about building systems that can pick themselves up, dust themselves off, and keep running, often without anyone even noticing. This, dear readers, is the silent heroism of automated system recovery.

The Clock and the Data: Why Every Second (and Byte) Counts

At the heart of any recovery strategy are two critical metrics, often abbreviated because, well, we love our acronyms in tech:

  • Recovery Time Objective (RTO): This is your deadline. It’s the absolute maximum time your application can afford to be offline after a disruption. Think of it like a popular online retailer during the sale on Big Billion days or the Great Indian Festival. If their website goes down for even a few minutes, that’s millions in lost sales and a lot of very unhappy shoppers. Their RTO would be measured in seconds, maybe a minute. For a less critical internal tool, like a quarterly report generator, an RTO of a few hours might be perfectly fine.
  • Recovery Point Objective (RPO): This defines how much data you’re willing to lose. It’s usually measured in a time interval, like “the last five minutes of data”. For that same retailer, losing even a single customer’s order is a no-go. Their RPO would be zero. But for this blog, if the last five minutes of comments disappear, it’s annoying, but not catastrophic. My RPO could be a few hours and for some news blogs few minutes would be acceptable.

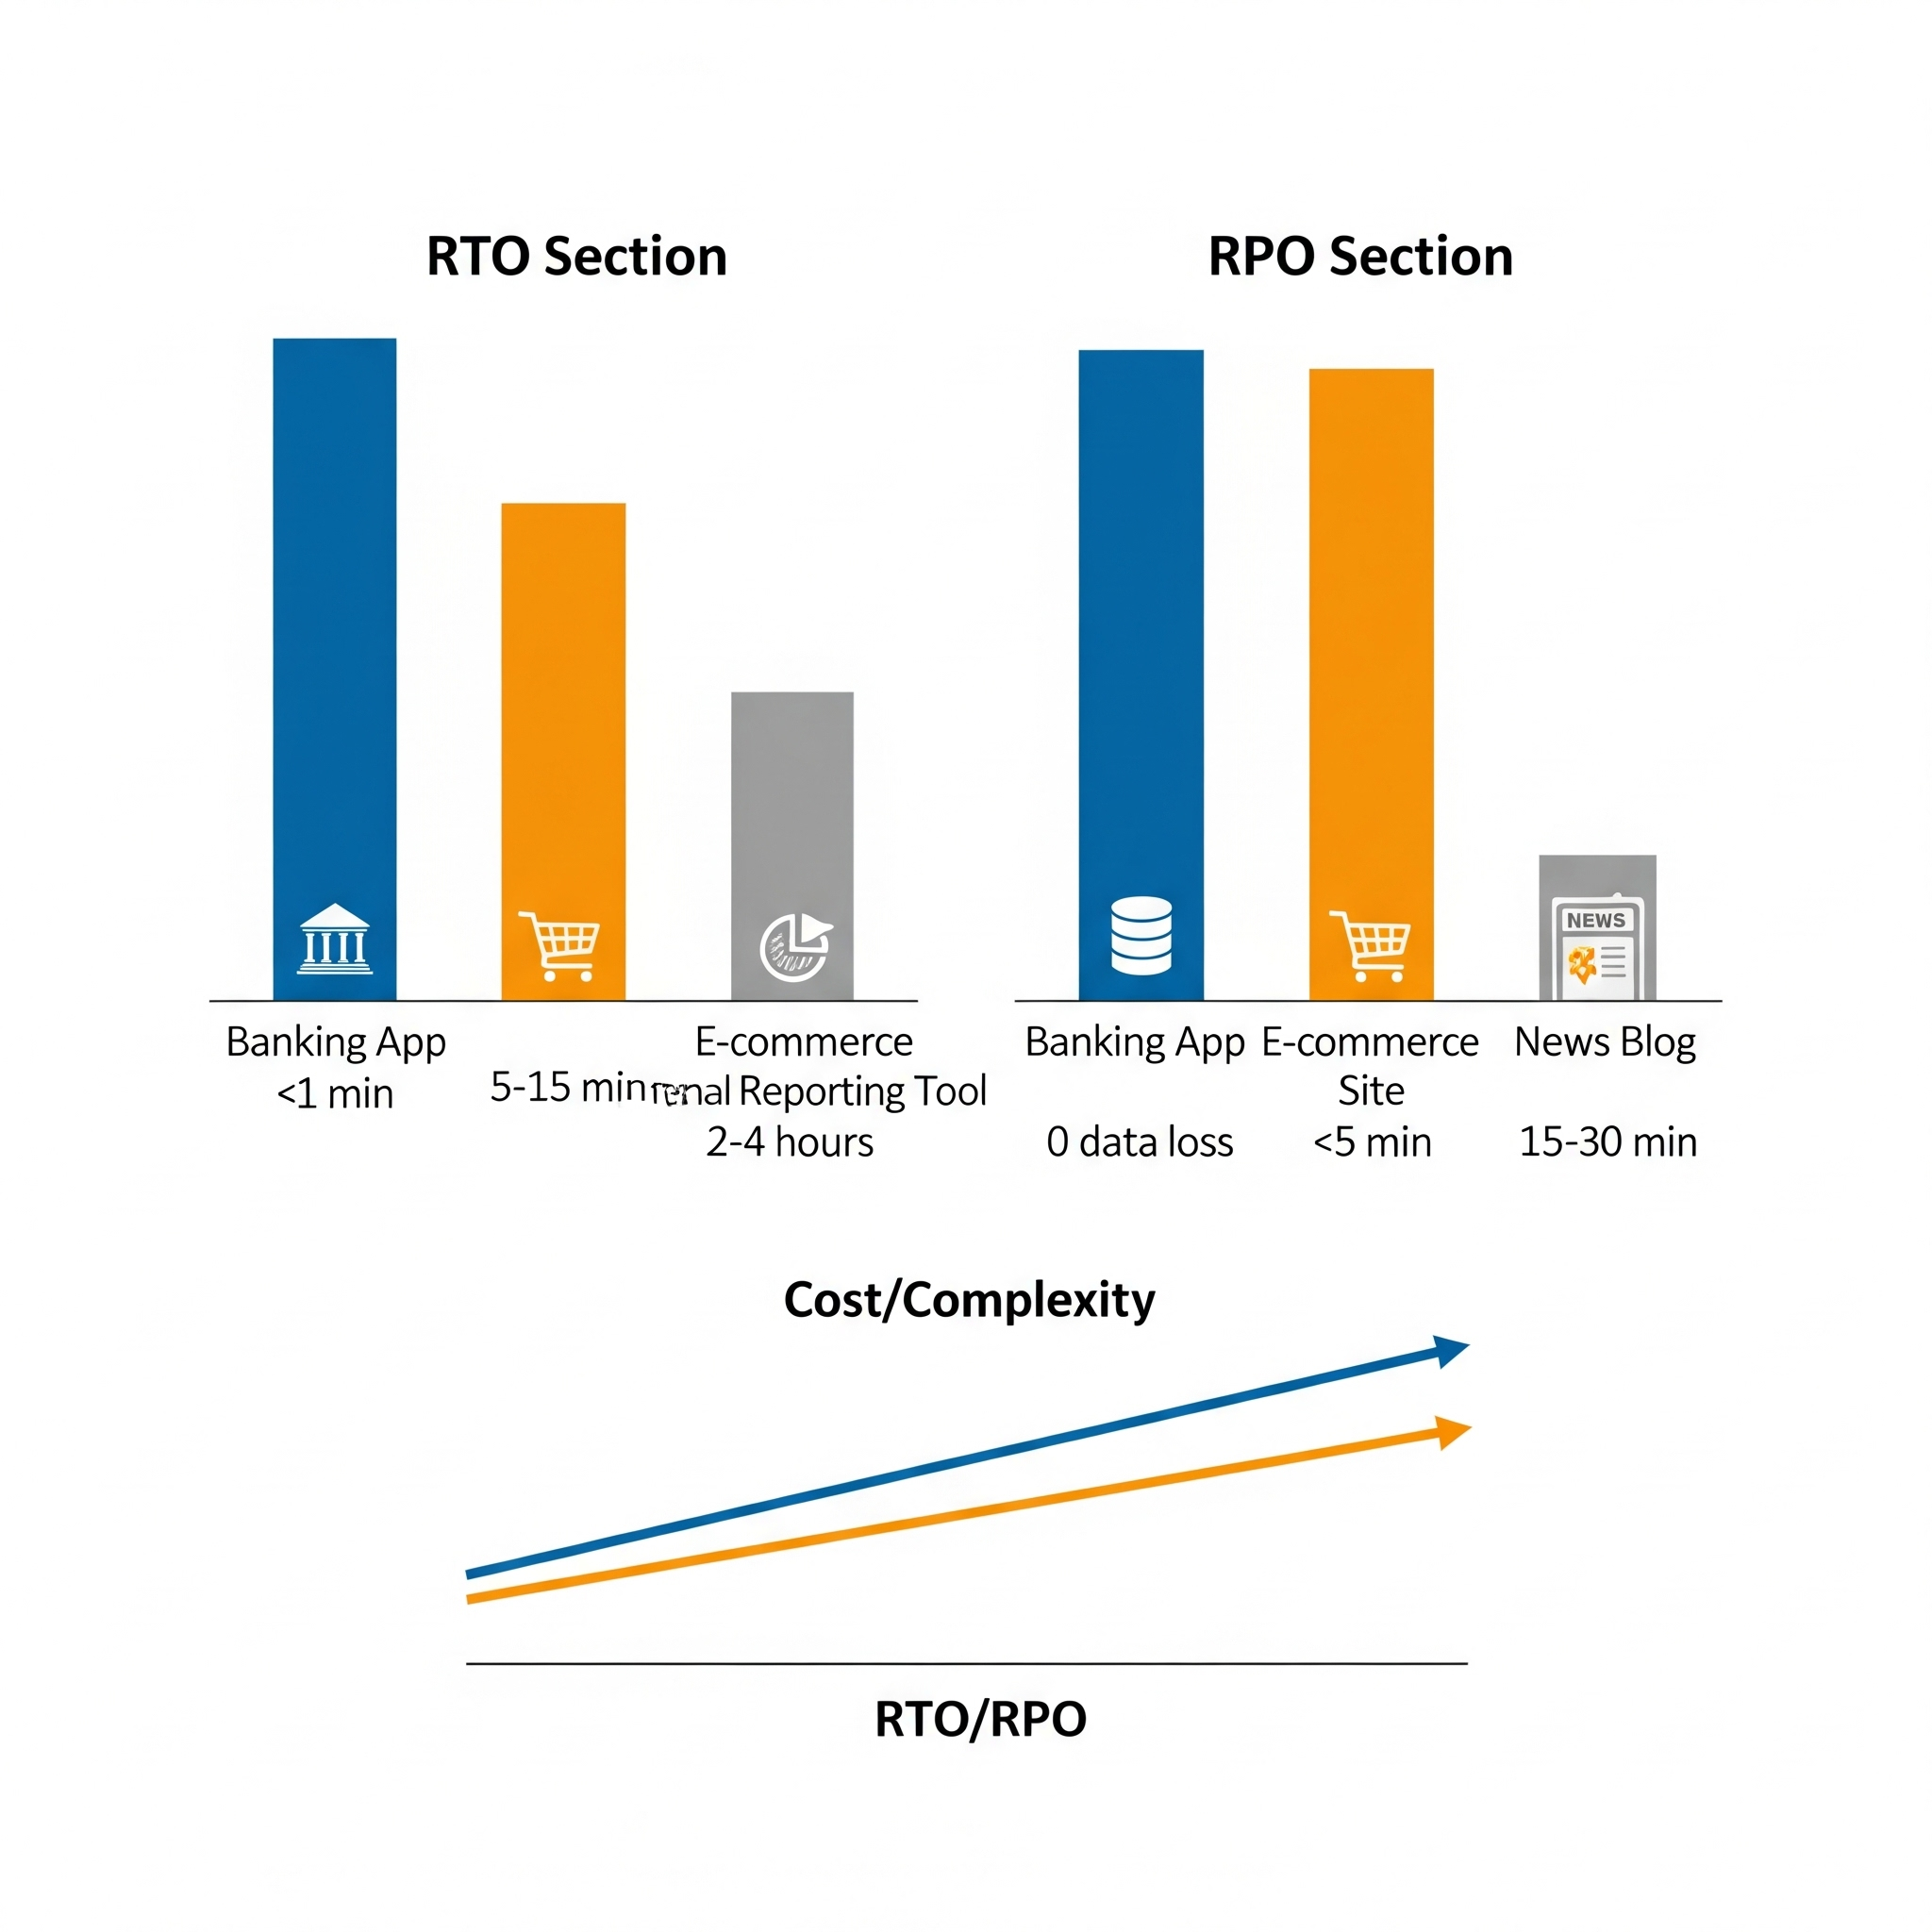
These aren’t just technical jargon; they’re business decisions. The tighter your RTO and RPO, the more complex and, frankly, expensive your recovery solution will be. It’s like choosing between a spare tire you have to put on yourself (longer RTO, lower cost) and run-flat tires that keep you going (near-zero RTO, higher cost). You pick your battles based on what your business can actually afford to lose, both in time and data.

Building on Solid Ground: The Principles of Resilience

So, how do we build systems that can withstand the storm? It starts with a few foundational principles:

1. Fault Tolerance, Redundancy, and Decentralization

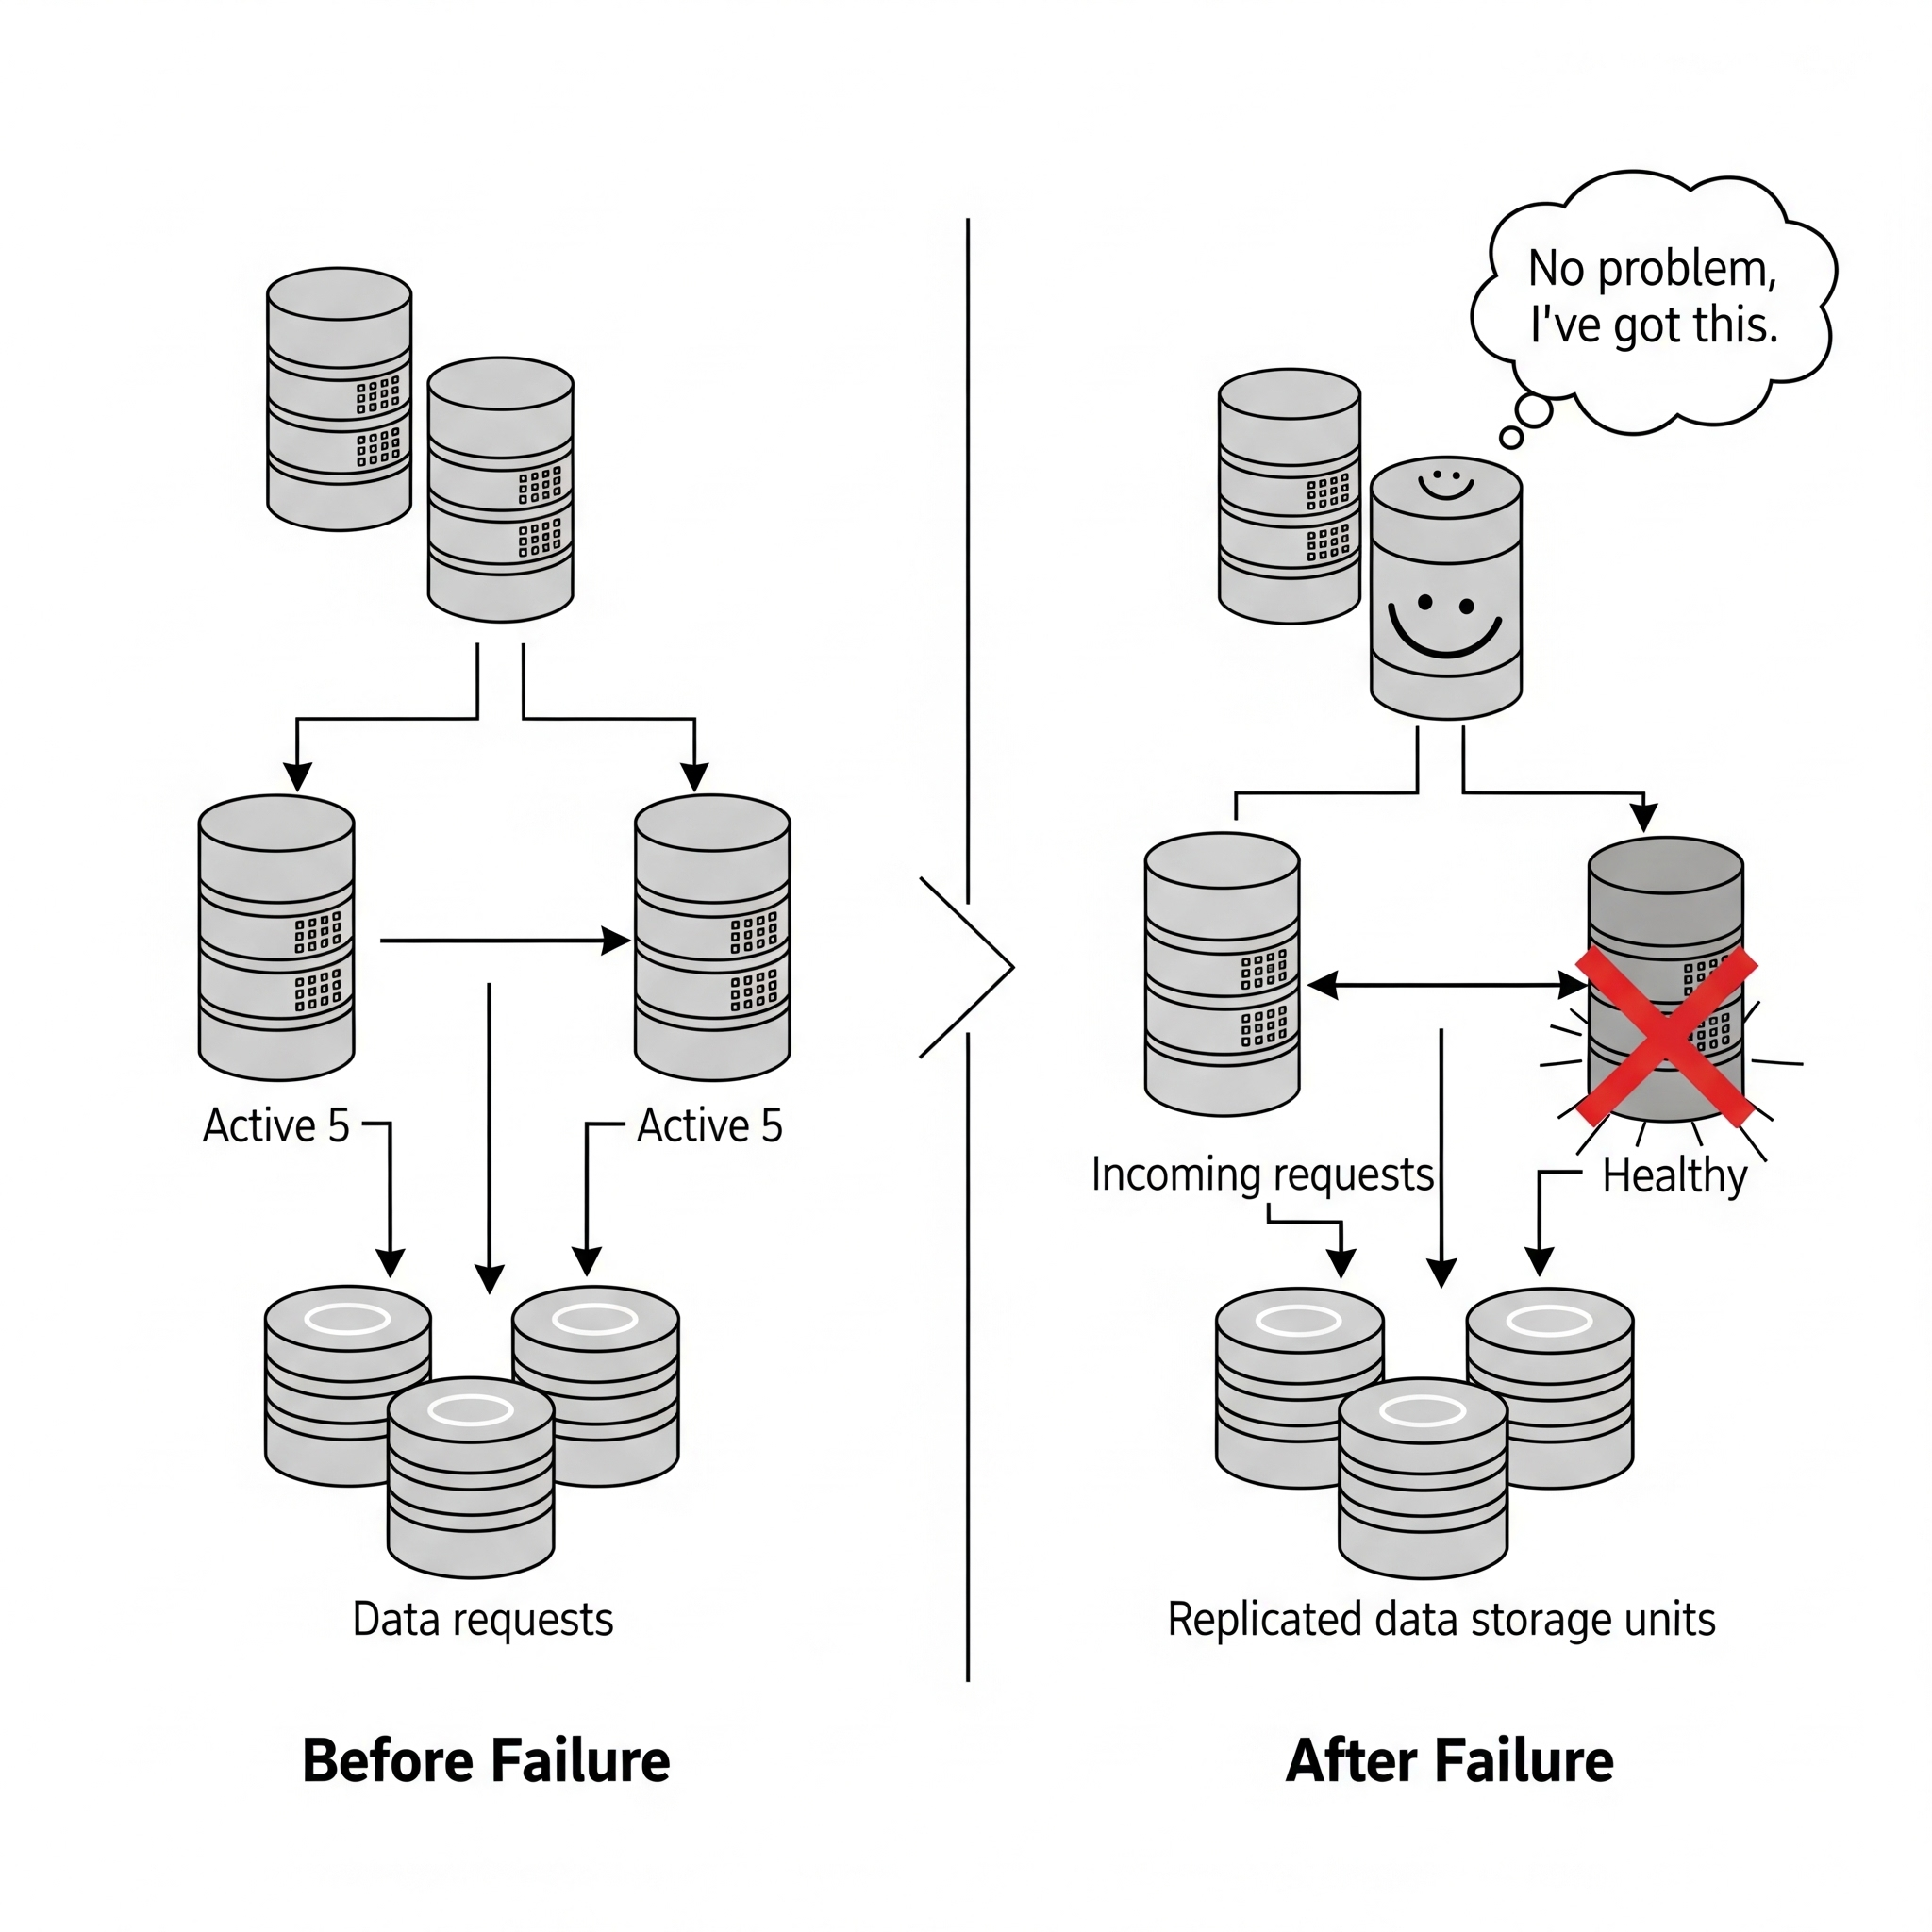
Imagine a bridge designed so that if one support beam fails, the entire structure doesn’t collapse. That’s fault tolerance. We achieve this through redundancy, which means duplicating critical components – servers, network paths, data storage – so there’s always a backup ready to jump in. Think of a data center with two power lines coming in from different grids. If one goes out, the other kicks in. Or having multiple copies of your customer database spread across different servers.

Decentralisation ensures that control isn’t concentrated in one place. If one part goes down, the rest of the system keeps chugging along, independently but cooperatively. It’s like a well-trained team where everyone knows how to do a bit of everything, so if one person calls in sick, the whole project doesn’t grind to a halt.

2. Scalability and Performance Optimization

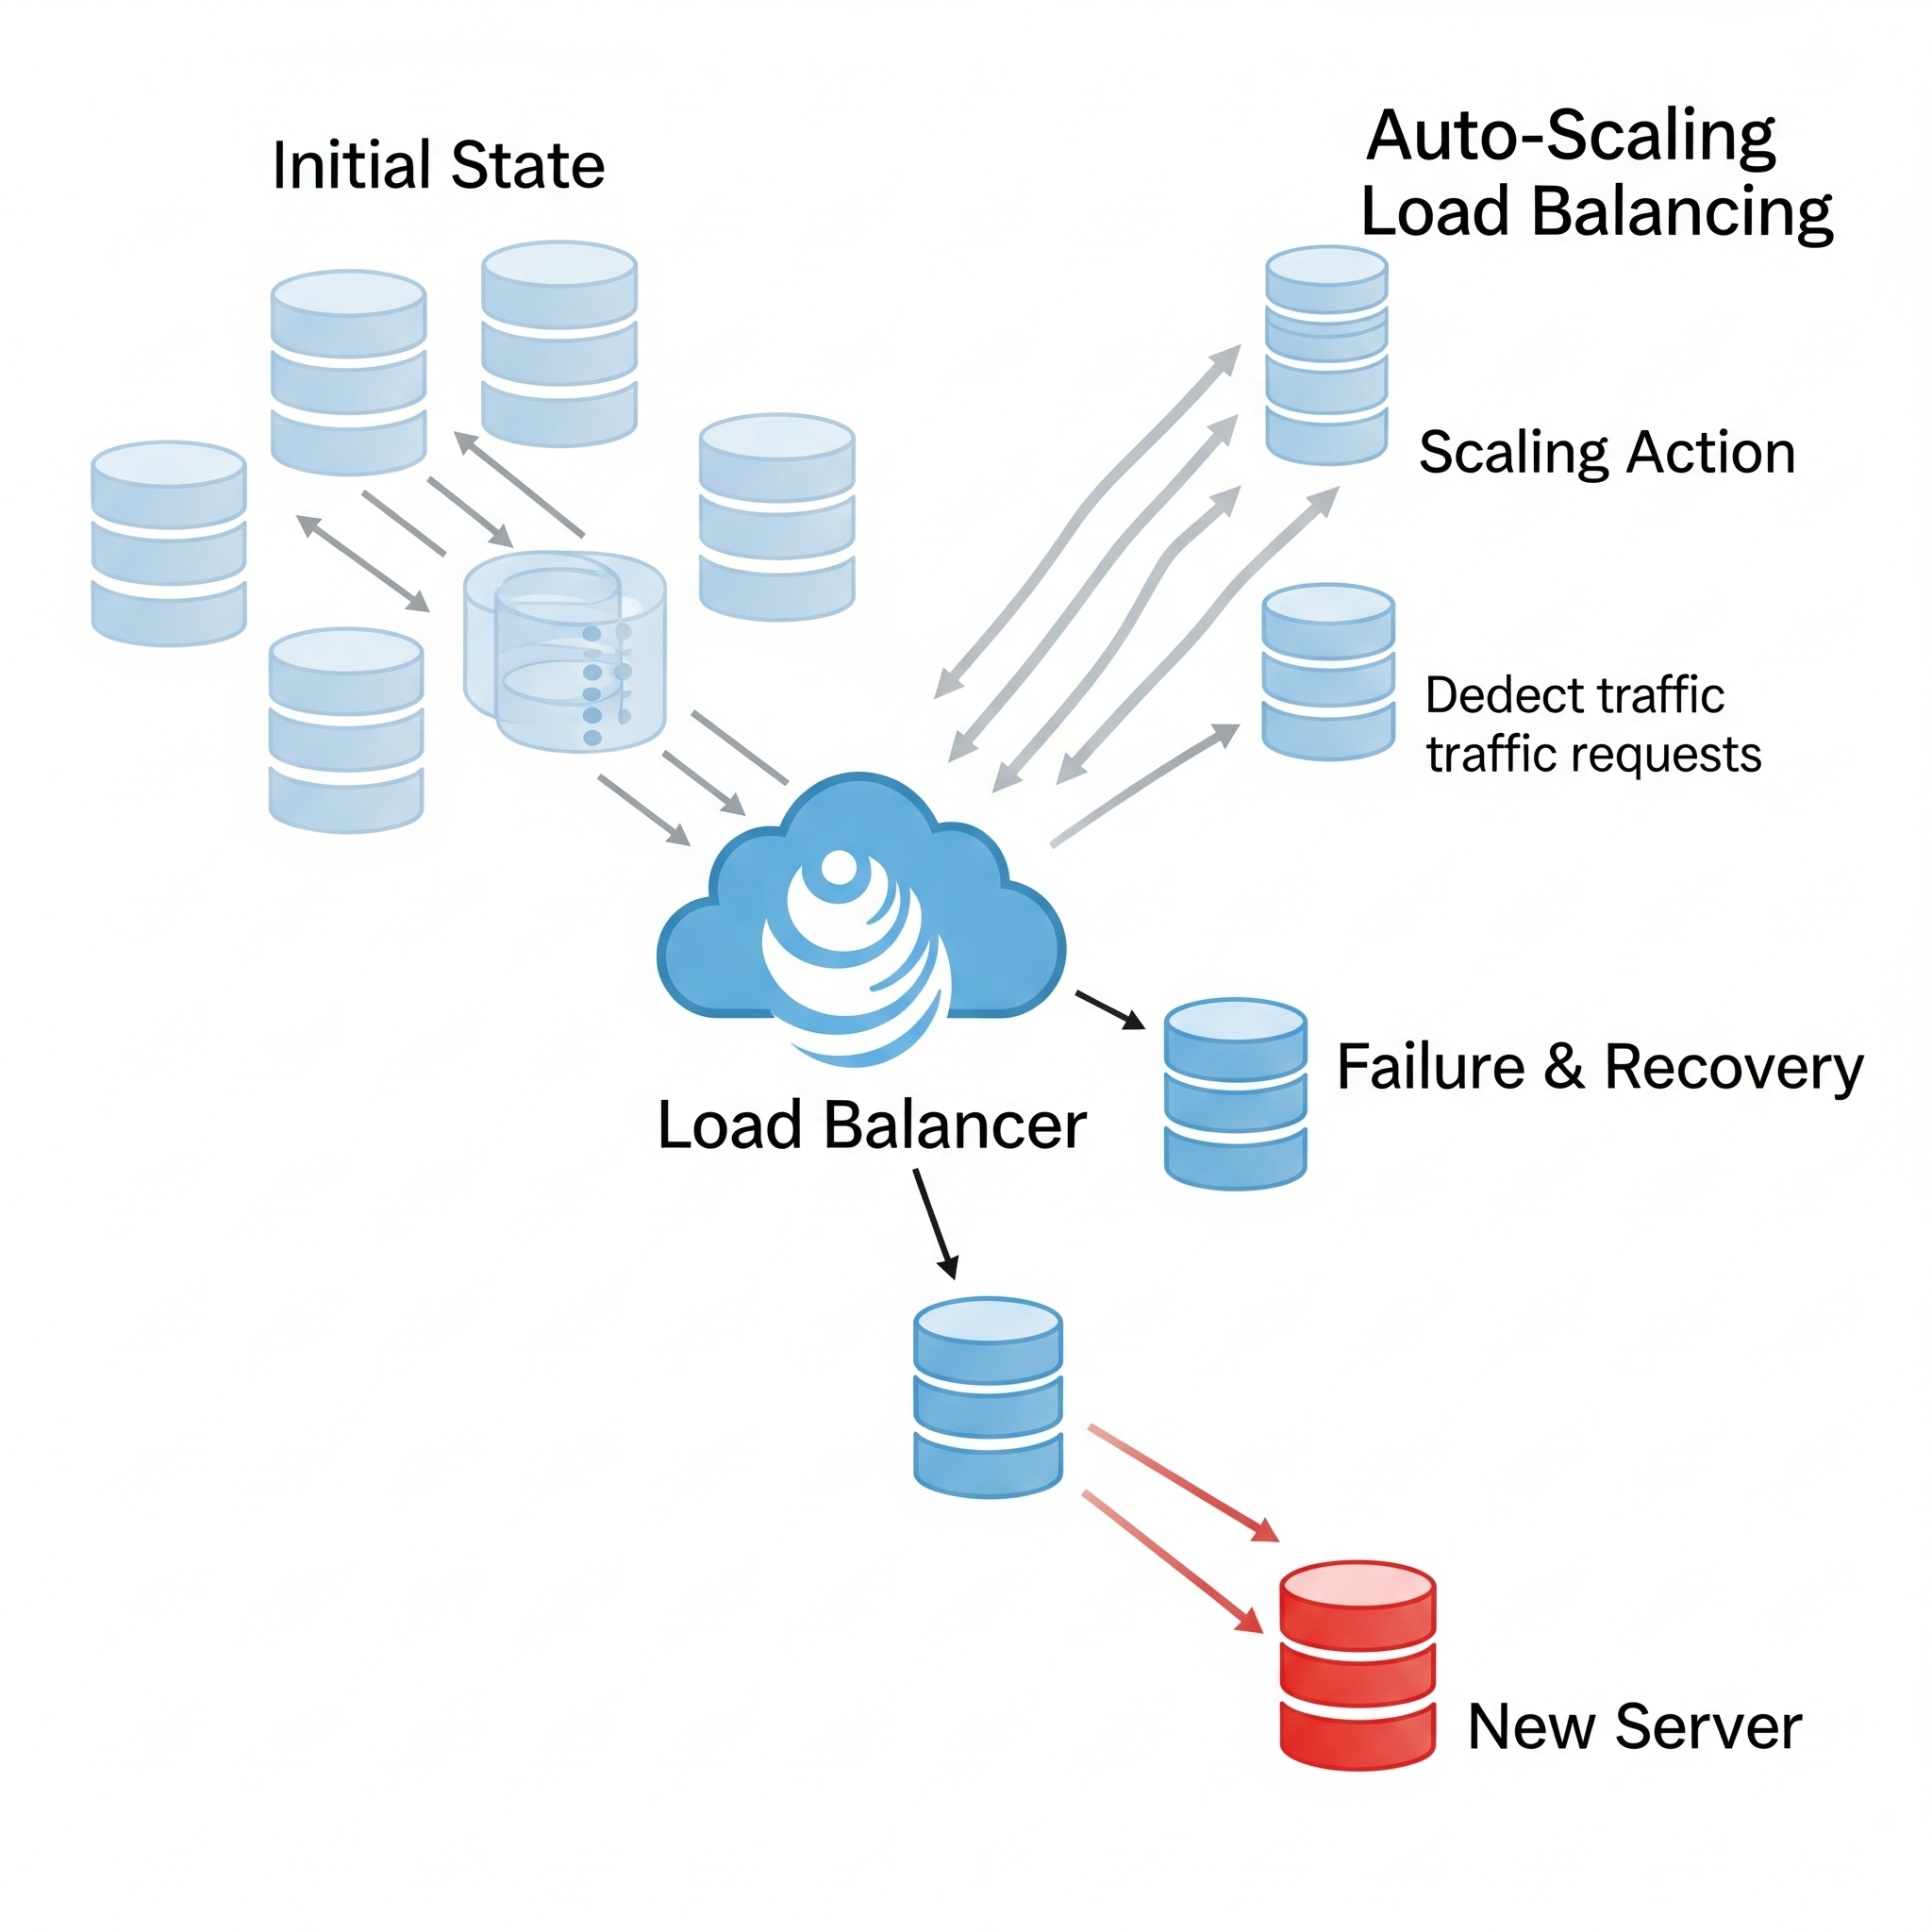
A resilient system isn’t just tough; it’s also agile. Scalability means it can handle growing demands, whether by adding more instances (horizontal scaling) or upgrading existing ones (vertical scaling). Think of a popular streaming service. When a new hit show drops, they don’t just hope their servers can handle the millions of new viewers. They automatically spin up more servers (horizontal scaling) to meet the demand. If one server crashes, they just spin up another, no fuss.

Performance optimization, meanwhile, ensures your system runs efficiently, distributing requests evenly to prevent any single server from getting overwhelmed. It’s like a traffic controller directing cars to different lanes on a highway to prevent a massive jam.

3. Consistency Models

In a distributed world, keeping everyone on the same page about data is a monumental task. Consistency ensures all parts of your system have the same information and act the same way, even if lots of things are happening at once. This is where consistency models come in.

  • Strong Consistency means every read gets the absolute latest data, no matter what. Imagine your bank account. When you check your balance, you expect to see the exact current amount, not what it was five minutes ago. That’s strong consistency – crucial for financial transactions or inventory systems where every single item counts.
  • Eventual Consistency is more relaxed. It means data will eventually be consistent across all replicas, but there might be a brief period where some parts of the system see slightly older data. Think of a social media feed. If you post a photo, it might take a few seconds for all your followers to see it on their feeds. A slight delay is fine; the world won’t end. This model prioritises keeping the service available and fast, even if it means a tiny bit of lag in data synchronisation.

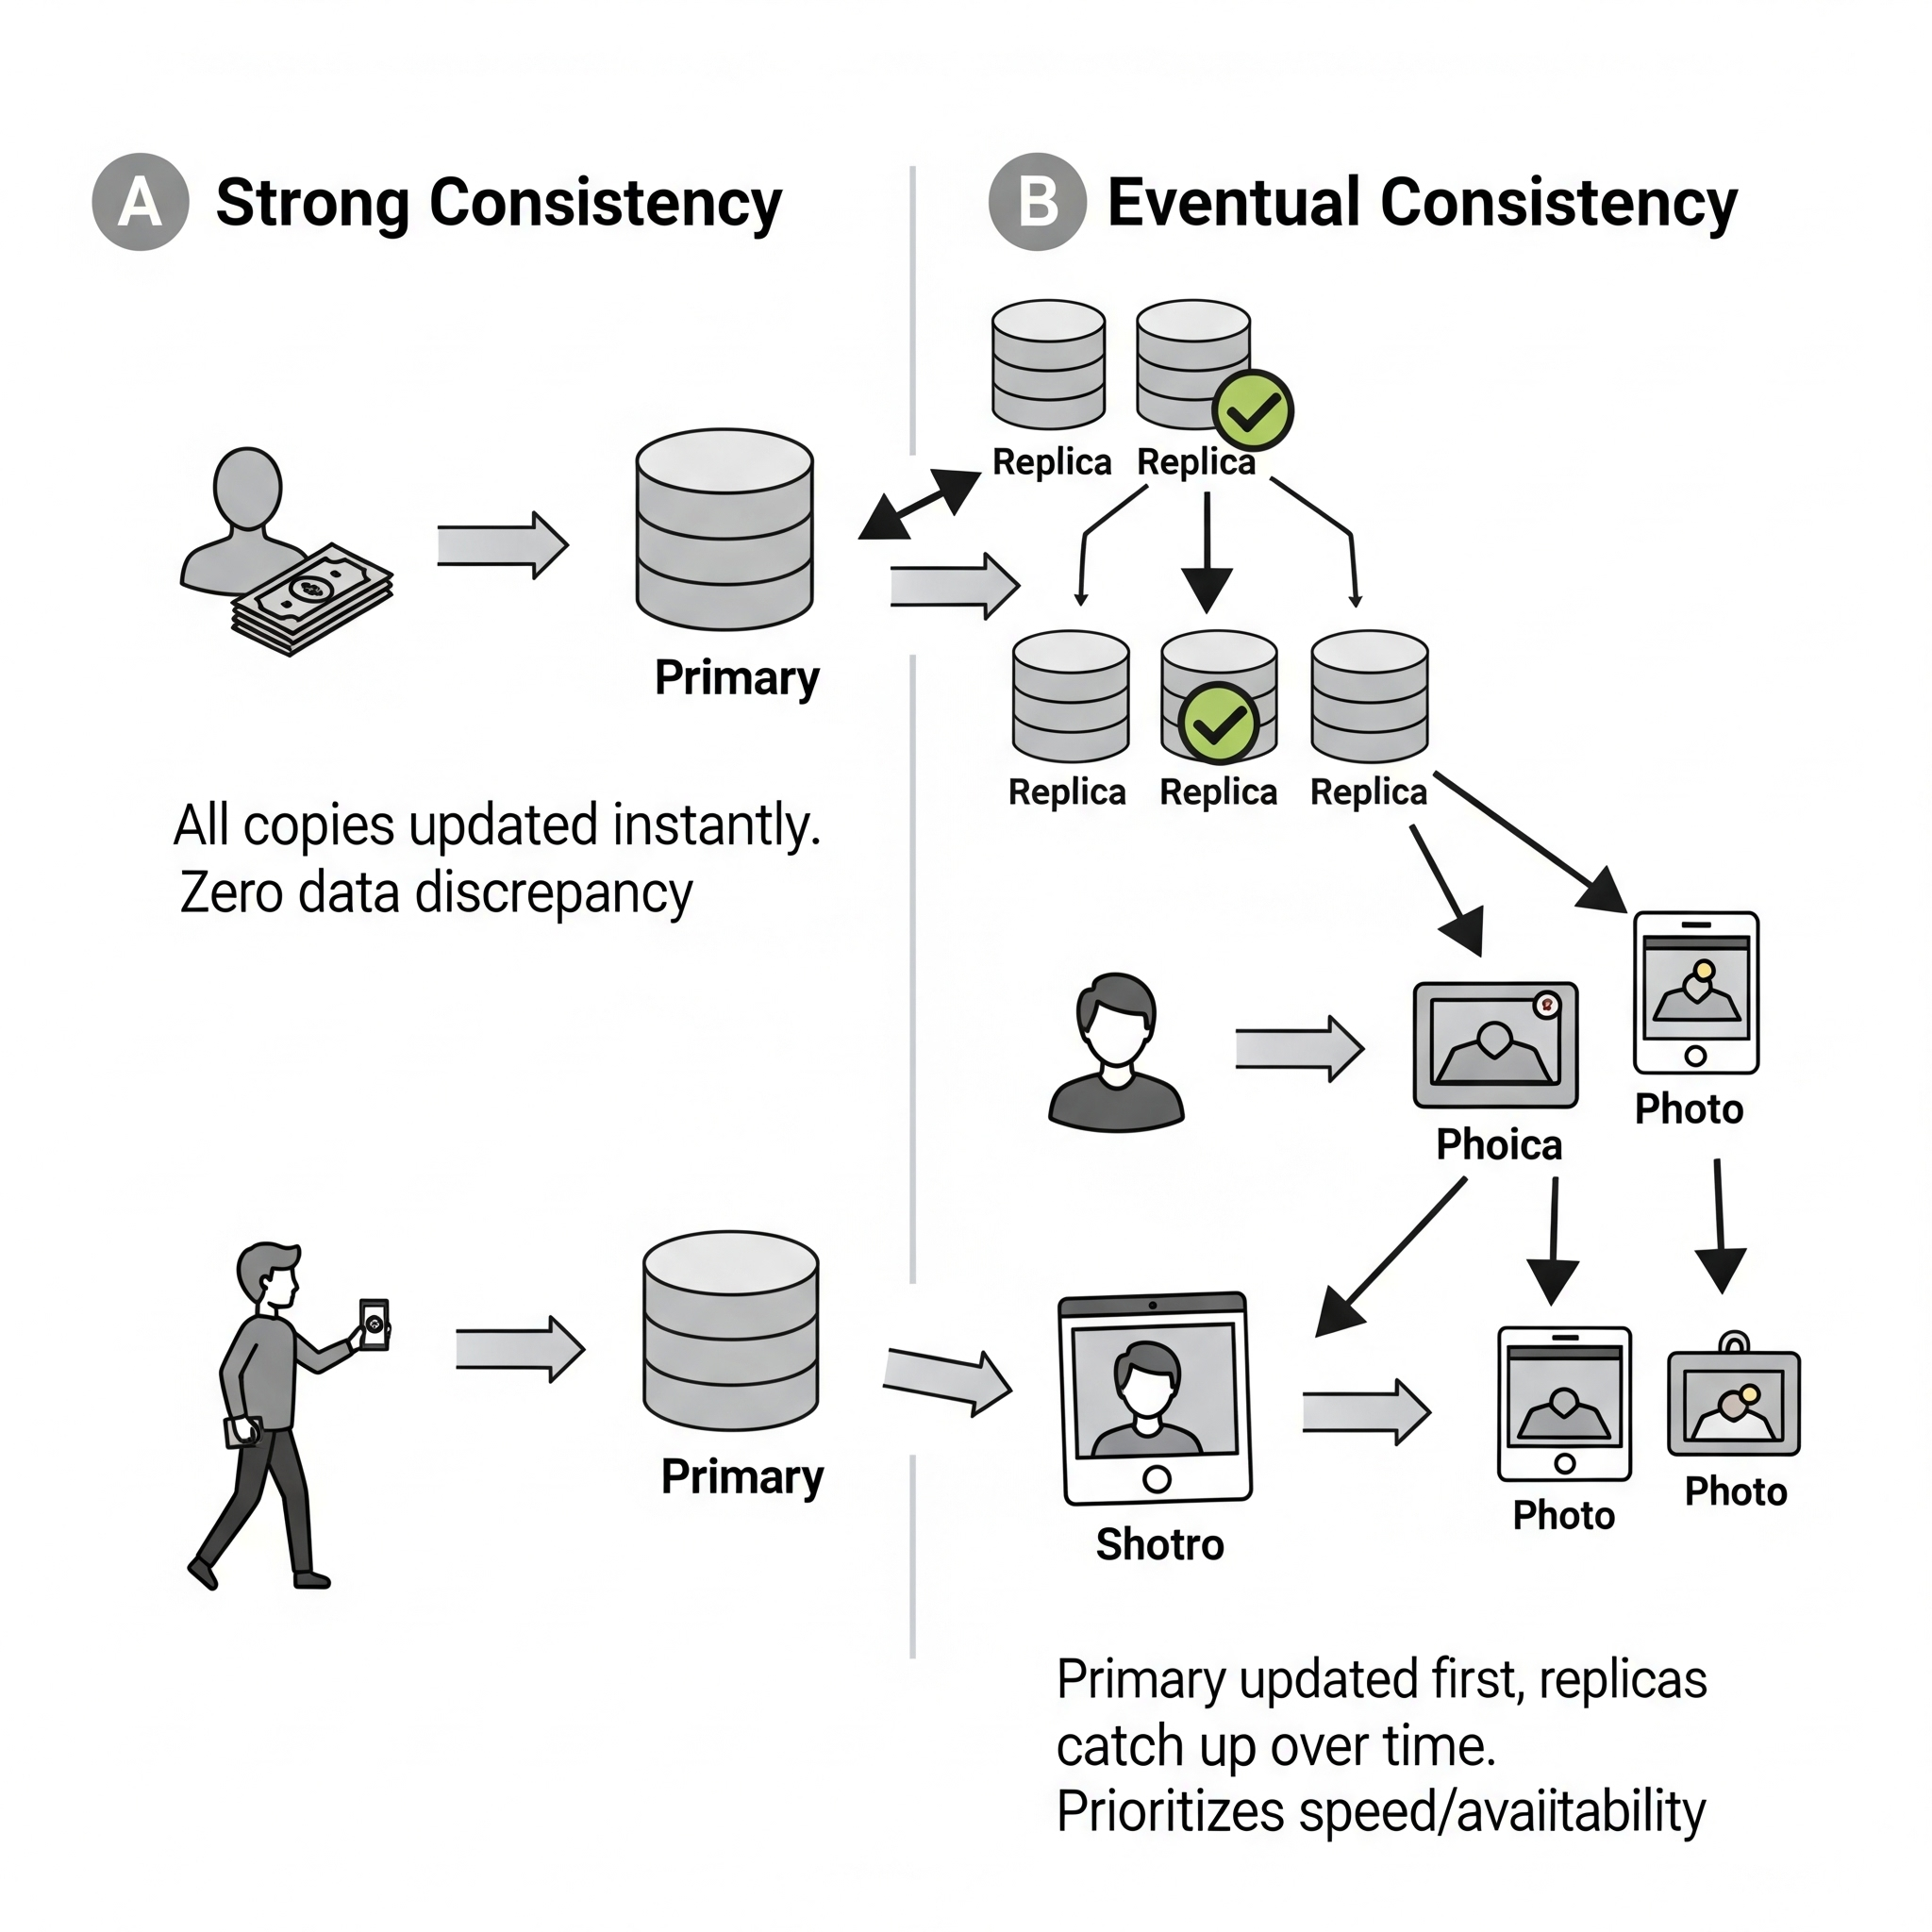
The choice of consistency model is a fundamental trade-off, often summarised by the CAP theorem (Consistency, Availability, Partition Tolerance) – you can’t perfectly have all three. It’s like trying to be perfectly on time, perfectly available, and perfectly consistent all at once – sometimes you have to pick your battles. Your decision here directly impacts how complex and fast your recovery will be, especially for applications that hold onto data.

In my next post, I will dive into the world of stateless applications and discover why their “forgetful” nature makes them champions of rapid, automated recovery. Stay tuned!

References and Recommended Reads

Here is an exhaustive set of references I have used for the series:

Posted in Resilience | Tagged , , , | Leave a comment

Book Review: Outage Box Set by T.W. Piperbrook

This five-book series by T.W. Piperbrook is a fast-paced, high-intensity ride packed with gore and werewolf horror. The story wastes no time plunging readers into chaos, delivering suspense and violent encounters that keep the adrenaline pumping.

Cover of the book series 'Outage' by T.W. Piperbrook, featuring a snowy background, a paw print, and bold text highlighting the title, author, and description of the series.Bo

The books are relatively short, and in my view, the entire story could have been comfortably told in a single novel without losing any impact. Still, spreading it across five books does create natural breakpoints that might appeal to readers who enjoy serialized horror.

There’s a wide cast of characters — some likable, others not — but all felt believable. Piperbrook does a good job showcasing different shades of human behavior when thrust into terrifying, high-stress situations. Some characters live, some merely survive, and their arcs add a grim realism to the story.

Overall, Outage is an okay read. It didn’t blow me away, but it held my interest enough that I’d be willing to try more of Piperbrook’s work before deciding how I feel about him as an author. A special mention to Troy Duran’s audio narration, which was well done and added an extra layer of tension to the story.

Posted in Uncategorized | Leave a comment

Why Insurance-Linked Plans Like HDFC Sanchay Par Advantage May Not Be as Attractive as They Look

Recently, I received a proposal for the popular HDFC Life Sanchay Par Advantage, a traditional insurance-linked savings plan that promises guaranteed payouts, a sizable life cover, and tax-free returns.

On the surface, the numbers look very impressive — large cumulative payouts, substantial maturity benefits, and a comforting insurance cushion.

But when you take a closer look, break down the actual yearly cash flows, and compute the real rate of return (IRR), the story changes quite dramatically.

In this post, I’ll show you:

✅ What the plan promises
✅ A year-by-year cash flow table
✅ A graph of cumulative balances
✅ And finally — why even with the maturity benefit, the actual return (IRR) is quite modest.

The Proposal Highlights

ParameterValue
ProductHDFC Life Sanchay Par Advantage
Annual Premium₹5,00,000
Premium Paying Term6 years
Life Cover₹52,50,000
Payout Period20 years (starting right after year 1)
Annual Payout₹1,05,200 (can be monthly)
Maturity Benefit (Year 20)₹37,25,000
Total Payouts + Maturity₹58,29,000 over 20 years

Sounds impressive, doesn’t it?

The Hidden Picture: Cash Flows Over Time

Let’s lay out the cash flows year by year.
In this plan:

  • You pay ₹5,00,000 in year 0 (start), then
  • From year 1 to year 5, you pay ₹5,00,000 each year but also start getting ₹1,05,200 payouts immediately, effectively reducing your net outgo to ₹3,94,800.
  • From year 6 to year 19, you receive ₹1,05,200 each year.
  • In year 20, you receive ₹1,05,200 plus the maturity benefit of ₹37,25,000.

Revised Cash Flow Table

YearCash FlowCumulative Balance
0-₹5,00,000-₹5,00,000
1-₹3,94,800-₹8,94,800
2-₹3,94,800-₹12,89,600
3-₹3,94,800-₹16,84,400
4-₹3,94,800-₹20,79,200
5-₹3,94,800-₹24,74,000
6+₹1,05,200-₹23,68,800
7+₹1,05,200-₹22,63,600
8+₹1,05,200-₹21,58,400
9+₹1,05,200-₹20,53,200
10+₹1,05,200-₹19,48,000
11+₹1,05,200-₹18,42,800
12+₹1,05,200-₹17,37,600
13+₹1,05,200-₹16,32,400
14+₹1,05,200-₹15,27,200
15+₹1,05,200-₹14,22,000
16+₹1,05,200-₹13,16,800
17+₹1,05,200-₹12,11,600
18+₹1,05,200-₹11,06,400
19+₹1,05,200-₹10,01,200
20+₹38,30,200+₹28,29,000

So by the end of 20 years, you have a gross cumulative balance of about ₹28.29 lakh — i.e. your payouts plus maturity exceed your total outgo by this amount.

The Real Return You Earn

Now let’s compute the effective IRR (internal rate of return) on these cash flows.

  • Over 6 years, you invest a total of ₹24,74,000 (after adjusting for payouts received during premium years).
  • Over 20 years, you get total payouts + maturity of ₹58,29,000.

So approximate CAGR is:

≈ (58,29,000 / 24,74,000) ^ (1/20) – 1 ≈ (2.35)^0.05 – 1 ≈ 4.4% p.a.

This means your effective compounded return is approximately 4.4% p.a. tax-free.

Why Do Such Plans Look So Lucrative?

Insurance sales illustrations often:

✅ Highlight large cumulative payouts like “₹58,29,000”,
✅ Emphasize tax-free income,
✅ Focus on the big life cover of ₹52.5 lakh,
✅ Present it as a “risk-free assured income.”

What they usually don’t show clearly is:

  • The actual yearly cash flows which are modest until the final year.
  • The impact of locking your money for 20 years.
  • How a 4.4% return lags inflation, which averages 5-6% over long periods.

Bottom Line: Should You Go for It?

So with the maturity benefit, the product is like a long-term tax-free FD yielding ~4.4%, with bundled life insurance.

If you value the insurance and the forced discipline, it might suit you. Otherwise:

✅ For insurance, a simple term plan of ₹52.5 lakh would cost just ~₹6-8k per year.
✅ For investment, diversified equity or balanced mutual funds over 20 years historically yield 10-12%, much better beating inflation.

If you still like such plans for the psychological comfort of “assured money,” that’s perfectly okay. But at least go in fully aware:

FeatureHDFC Sanchay Par AdvantageTerm Plan + Equity SIP
Life cover₹52.5 lakh bundled₹52.5 lakh for ~₹8k/year
Total 6-year outgo₹30 lakh₹30 lakh into SIP + minimal for term
Expected corpus @20 yrs~₹58 lakh (4.4% IRR)~₹1.1 crore (12% SIP CAGR)
Flexibility & liquidityLocked for 20 yrsWithdraw anytime from SIP

They are insurance-led savings products — not true investment plans.
Your money could work much harder for you elsewhere.

Posted in Uncategorized | Leave a comment

Using Telegram for Automation Using Python Telethon Module

Telegram is a cloud based messaging application which provides an excellent set of APIs to allow developers to automate on top of the platform. It is increasingly being used to automate various notifications and messages. It has become a platform of choice to create bots which interact with users and groups.

Telethon is an asyncio Python 3 library for interacting with telegram API. It is one of the very exhaustive libraries which allows users to interact with telegram API as a user or as a bot.

Recently I have written some AWS Lambda functions to automate certain personal notifications. I could have run the code as a container on one of my VPSs or on Hulu or other platforms, but I took this exercise as an opportunity to learn more about serverless and functions. Also, my kind of load is something which can easyly fall under the Lambda free tier.

In this post we will look into the process of how to start with the development and write some basic python applications.

Registering As a Telegram Developer

Following steps can be followed to obtain the API ID for telegram –

  • Sign up for Telegram using any application
  • Login to the https://my.telegram.org/ website using the same mobile number. Telegram will send you a confirmation code on Telegram application. After entering the confirmation code, you will be seeing the following screen –
Screenshot of Telegram Core Developer Page
  • In the above screen select the API Development Tools and complete the form. This page will provide some basic information in addition to api_id and api_hash.

Setting up Telethon Development Environment

I assume that the reader is familiar with basic python and knows how to set up a virtual environment, so rather than explaining, I would more focus on quick code to get the development environment up and running.

$ mkdir telethon-dev && cd telethon-dev 
$ python3 -m venv venv-telethon
$ source venv-telethon/bin/activate
(venv-telethon) $ pip install --upgrade pip
(venv-telethon) $ pip install telethon
(venv-telethon) $ pip install python-dotenv

Obtaining The Telegram Session

I will be using .env file for storing the api_id and api_hash so that the same can be used in the code which we will write. Replace NNNNN with your api_id and XX with your api_hash

TELEGRAM_API_ID=NNNNN
TELEGRAM_API_HASH=XXXXXXXXXXXXXXXXXXXXXXXXXXXXXX

Next we will need to create a session to be used in our code. For full automation, it is needed that we store the session either as a file or as a string. Since the cloud environments destroy the ephimeral storage they provide, so I will get the session as a string. The following python code will help obtain the same.

#! /usr/bin/env python3

import os

from dotenv import load_dotenv

from telethon.sync import TelegramClient
from telethon.sessions import StringSession

load_dotenv()

with TelegramClient(StringSession(), os.getenv("TELEGRAM_API_ID"), os.getenv("TELEGRAM_API_HASH")) as client:
    print(client.session.save())

When this code is executed, it will prompt for your phone number. Here you would need to print the phone number with the country code. In the next step, an authorization code will be received in the telegram application which would need to be entered in the application prompt. Once the authorization code is typed correctly, the session will be printed as a string value on standard output. You would need to save the same.

(venv-telethon) $ ./get_string_session.py
 Please enter your phone (or bot token): +91xxxxxxxxxx
 Please enter the code you received: zzzzz
Signed in successfully as KKKKKK KKKKKKK
9vznqQDuX2q34Fyir634qgDysl4gZ4Fhu82eZ9yHs35rKyXf9vznqQDuX2q34Fyir634qgDyslLov-S0t7KpTK6q6EdEnla7cqGD26N5uHg9rFtg83J8t2l5TlStCsuhWjdzbb29MFFSU5-l4gZ4Fhu9vznqQDuX2q34Fyir634qgDysl9vznqQDuX2q34Fyir634qgDy_x7Sr9lFgZsH99aOD35nSqw3RzBmm51EUIeKhG4hNeHuF1nwzttuBGQqqqfao8sTB5_purgT-hAd2prYJDBcavzH8igqk5KDCTsZVLVFIV32a9Odfvzg2MlnGRud64-S0t7KpTK6q6EdEnla7cqGD26N5uHg9rFtg83J8t2l5TlStCsuhWjdzbb29MFFSU5=

I normally put the string session along with the API ID and Hash in the .env file. All these three values would need to be protected and should never be shared with a third party.

For the next code, I will assume that you have used a variable TELEGRAM_STRING_SESSION. So the final .env file will look like below –

TELEGRAM_API_ID=NNNNN
TELEGRAM_API_HASH=XXXXXXXXXXXXXXXXXXXXXXXXXXXXXX
TELEGRAM_STRING_SESSION=YYYYYYYYYYYYYYYYYYYYYYYYYYYYYYYYYYYYYY

Sending a Message to A Contact

Now we have the ground work done, so we will write a simple python application to send a message to a contact. The important point to note here is that the recipient must be in your telegram contacts.

#! /usr/bin/env python3

import os

from telethon.sync import TelegramClient
from telethon.sessions import StringSession
from dotenv import load_dotenv

load_dotenv()

try:
    client = TelegramClient(StringSession(os.getenv("STRING_TOKEN")), os.getenv("API_ID"), os.getenv("API_HASH"))
    client.start()
except Exception as e:
    print(f"Exception while starting the client - {e}")
else:
    print("Client started")

async def main():
    try:
        # Replace the xxxxx in the following line with the full international mobile number of the contact
        # In place of mobile number you can use the telegram user id of the contact if you know
        ret_value = await client.send_message("xxxxxxxxxxx", 'Hi')
    except Exception as e:
        print(f"Exception while sending the message - {e}")
    else:
        print(f"Message sent. Return Value {ret_value}")

with client:
    client.loop.run_until_complete(main())

Next Steps

The telethon API is quite versatile, a detailed API documentation can be find at https://tl.telethon.dev/. Hope this post will help the reader quickly start off with the telegram messaging with telethon module.

Posted in Automation, Programming, Tips/Code Snippets | Tagged , , , | 1 Comment

Adding Custom Python Packages for AWS Lambda Functions

Python is a popular language along with Javascript (NodeJS) for writing AWS lambda functions. Lambda function written in Python support the core modules, so one may choose to use the http.client instead of much simpler requests. However, if the function is to use some custom or non-native packages such as request and response we have few methods available to us.

In this article I will be discussing one such method of uploading a zip file containing all such custom packages and adding an AWS Lambda Layer to use this zip file for the particular function. We will be making use of Docker containers for this process. To be honest we actually do not need to go through the process of using a docker container. We can use only a simple pip install -t, zip the directory and upload it. However, certain python modules need to compile extensions written in C or C++. For such modules, the pip install -t approach will not work as the AWS Lambda functions use AWS Linux environment and you may have OSX, Windows or any other linux distribution of your choice. If you are sure that your modules do not have compiled extensions, please follow steps 2 and 3 below in this post.

Step 1 – Build and Run the Docker Container

The pre-requisite for this step is to have Docker installed. If you are on OSX, you can use Docker for Desktop. In this step we will use Amazon Linux base image and install desired version of python and few modules and OS packages. Amazon Linux 2 is a long term support release available at this moment. Amazon Linux 2 provides amazon-linux-extras which allows availability of newest application software on a stable base. At the time of writing this, Python 2.7 has been depricated by Amazon and the recommended version is Python 3.8. We would be needing to use amazon-linux-extras to install Python 3.8. Following Dockerfile is a very simple and self-explanatory file which we will be using to build our container –

FROM amazonlinux:2

RUN amazon-linux-extras enable python3.8 && \
          yum install -y python38 && \
          yum install -y python3-pip && \
          yum install -y zip && \
          yum clean all

RUN python3.8 -m pip install --upgrade pip && \
          python3.8 -m pip install virtualenv

Build the container using the following command –

$ docker build -f Dockerfile.awslambda -t aws_lambda_layer:latest

Once the container is built, it can be run as –

user1@macbook-air $ docker run -it --name aws_lambda_layer aws_lambda_layer:latest bash

This will give the bash shell inside the container. Next step will install the required modules in a python 3.8 virtual-environment and package as a zip file

Step 2 – Install Non-Native Packages and Package These As A Zip File

We will install the required packages inside a virtual environment, this will allow to reuse the same container for other future packaging also.

# python3.8 -m venv venv-telethon

Next, activate the virtual environment and install the packages in it under a specific folder, so that the same can be packaged. After packaging the folder, the zip file needs to be copied outside the container so that the same can be uploaded –

# source venv-telethon/bin/activate
(venv-telethon) # pip install telethon -t ./python
(venv-telethon) # deactivate

# zip -r python.zip ./python/

user1@macbook-air $ docker cp aws_lambda_layer:python.zip ./Desktop/

Step 3 – Upload the Package to the AWS Lambda Layer or S3

If the zip file is more than 50 MB, it has to be uploaded to Amazon S3 store. In case you decide to upload it S3 store, ensure that the path of the file is recorded carefully.

To upload the file, under the Lambda->Layer, click on Create Layer and fill up the form. The form will allow to upload the zip file or specify the path of the AWS S3 location where the file is uploaded.

Now write your lambda function and use the modules which were uploaded as a part of the zip file.

Posted in Containers, Programming | Tagged , , , , | Leave a comment