Ajitabh Pandey's Soul & Syntax

Exploring systems, souls, and stories – one post at a time

Tag: Debian

  • Upgrading Raspbian 8 (Jessie) to Raspbian 9 (Stretch)

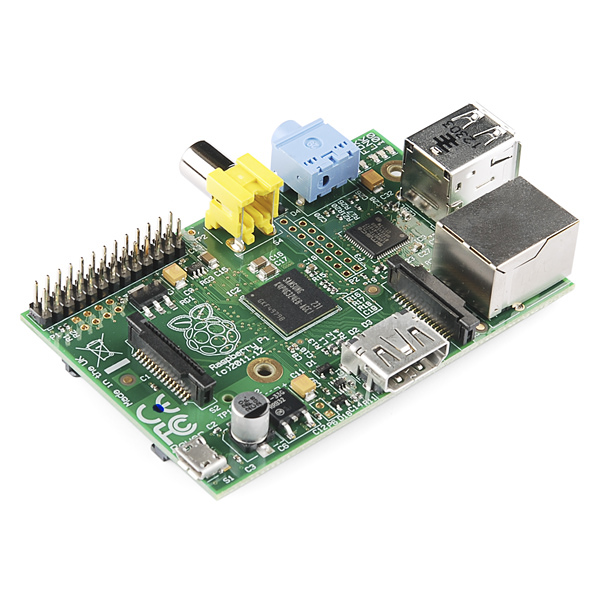
    I decided to upgrade my oldest Raspberry Pi to the latest Raspbian. Since I was two releases behind, I decided to do it step-by-step. Today I updated from 8 – 9. I plan. to perform similar steps to upgrade 9 – 10.

    Following are the quick sequence of steps I followed to perform the upgrade. This is a Model B Rev 2 Pi, so was considerably slow to update and took me more than 4 hours to complete.

    Step 1 – Prepare The System For Upgrade

    Apply the latest updates to the system.

    $ sudo apt update && sudo apt upgrade -y && sudo apt-get dist-upgrade -y

    Next step is to search for packages which have been only partially installed on the system using dpkg -C command.

    $ sudo dpkg -C

    The dpkg may indicate what needs to be done with these. I did not find anything under this category, which was good. In last, I ran apt-mark showhold command to get a list of all packages which have been marked as hold.

    $ sudo apt-mark showhold

    While I did not get any packages in this list, but if there are any, we are expected to resolve this before proceedig to step 2.

    Stpe 2 – Prepare the APT System for Upgrade

    $ sudo sed -i 's/jessie/stretch/g' /etc/apt/sources.list
    $ sudo sed -i 's/jessie/stretch/g' /etc/apt/sources.list.d/raspi.list
    $ echo 'deb http://archive.raspberrypi.org/debian/ stretch main' >> /etc/apt/sources.list

    I am updating only the two files but if your system has any other source files, then you need to update them appropriately as well. A list of such files can be found using – grep -lnr jessie /etc/apt

    In addition to this I also removed the package apt-listchange which displays what changed in the new version of the Debian package as compared to the version currently installed on the system. This is expected to speed-up the entire process. This is not mandatory, so you can skip it.

    # optional step
    $ sudo apt-get remove apt-listchange 

    Step 3 – Perform The Upgrade and Cleanup

    As a last step initiate the upgrade process. This is the time where you can just leave the system for few hours.

    $ sudo apt update && sudo apt upgrade -y && sudo apt-get dist-upgrade -y

    I faced issues with chromium-browser and at the last command (dist-upgrade), the dpkg bailed out with a message indicating archive corruption of chromium-browser package. Since I am at Run Level 3, and do not need chromium on the headless pi, I decided to remove the following three packages. In any case in the absence of chromium, the debian system will automatically use update-alternatives and choose epiphany-browser to satisfy gnome-www-browser requirement.

    $ sudo apt-get remove chromium-browser chromium-browser-l10n rpi-chromium-mods

    After removing the chromium browser, I did another round of update, upgrade and dist-upgrade, just to make sure before initiating the cleanup as below –

    $ sudo apt-get autoremove -y && sudo apt-get autoclean

    The new OS version can be verified by

    $ cat /etc/debian_version;cat /etc/os-release

    I also took this opportunity to update the firmware of the raspberry pi by running the following command. Please note this step is absolutely optional and it is recomended also that do not perform this unless you know what you are doing or you are being asked by a support person.

    $ sudo rpi-update

  • Raspberry Pi – rsyslog fixes on Raspbian 8 (Jessie)

    Raspberry Pi – rsyslog fixes on Raspbian 8 (Jessie)

    One of my Raspberry Pi (Raspberry Pi Model B Rev 2) is running quite old versio of Rasbian – although fully updated and patched. Today while checking the syslog on my raspberry pi, I noticed the following error which was very frequently – almost every minute and thus was filling up the syslog.

    Dec 24 20:59:35 rads rsyslogd-2007: action 'action 17' suspended, next retry is Thu Dec 24 21:01:05 2020 [try http://www.rsyslog.com/e/2007 ]

    Thanks to logrotate I was not in an immediate need for action, but still I thought it will be better to fix this – atleast that will reduce the write and increase life of my SD Card.

    The URL at the end of the message was very helpful. According to the specified URL this message simply means that rsyslog.conf contains the instruction to write to the xconsole pipe, but this pipe is never read. on editing the /etc/rsyslog file, the following section can be commented out or removed completely.

    daemon.*;mail.*;\        news.err;\        *.=debug;*.=info;\        *.=notice;*.=warn       |/dev/xconsole

    A simple systemctl restart rsyslog after that will fix the issue.

    I did not see this issue on my other Raspberry Pi which runs Raspbian based on Debian Buster (Debian 10). I checked the /etc/rsyslog.conf on that and could not find the offending lines there. So my understanding is that this issue is with Raspbian based on Jessie.

  • Apt Pinning in Raspbian

    Quite sometime back I wrote a blog entry on apt-pinning to mix multiple repositories in debian and prioritize them. Recently, I felt the need to do the same on my raspberry pi.

    I use rsnapshot to backup remote systems. Rsnapshot has an associated perl script which is meant to send beautiful reports via email at the end of the backup. The script in the version which came with raspbian was broken (1.3.1-4+deb8u1) and I needed 1.4.2-1, which is available in Debian Stretch.

    Following my earlier post, I performed the following steps to perform the installation of the required version without impacting the rest of the system. As you can see that the priority of Jessie is higher than that of Stretch, which will ensure that the system does not get messed up when you do an upgrade.

    # Create the preferences file for jessie and stretch as shown below
    $ sudo vi /etc/apt/preferences.d/jessie.pref
    Package: *
    Pin: release n=jessie
    Pin-Priority: 900
    
    $ sudo vi /etc/apt/preferences.d/stretch.pref
    Package: *
    Pin: release a=stretch
    Pin-Priority: 750
    
    # Define the package sources for both jessie and stretch
    $ sudo vi /etc/apt/sources.list.d/jessie.list
    deb http://mirrordirector.raspbian.org/raspbian/ jessie main contrib non-free rpi
    
    $ sudo vi /etc/apt/sources.list.d/stretch.list
    deb http://mirrordirector.raspbian.org/raspbian/ stretch main contrib non-free rpi
    
    # Refresh the cache and sources list
    $ sudo apt-get update
    
    # Install the desired package by specifying the repository from which 
    # it has to be installed
    $ sudo apt-get install rsnapshot -t stretch

    Please be careful before performing these steps in a production system.

  • RPi – Static IP Address on Wifi

    There is a GUI tool in the desktop called “wpa_gui” which can be used to connect to the wireless network provided you have a supported wireless card attached to the RPi. However, if I want to run a headless RPi I would need a static IP address. Unfortunately “wpa_gui” does not provide me a means of configuring static IP address on the “wan0″ interface and my ADSL router does not support associating a static IP address with a MAC Address. This means I have to use static IP address configured on my wireless interface on the RPi and have to do it the old fashioned way (read I am loving it).

    Open up the “/etc/network/interfaces” file and make the following entries. The commented lines are the one’s which were added by the “wpa_gui” and we don’t need them. If you have little Debian experience, you will find these lines self explanatory:

    auto lo
    iface lo inet loopback
    
    #auto eth0
    iface eth0 inet static
    address eth0 192.168.1.52
    netmask 255.255.255.0
    gateway 192.168.1.1
    
    auto wlan0
    allow-hotplug wlan0
    iface wlan0 inet static
    address 192.168.1.51
    netmask 255.255.255.0
    gateway 192.168.1.1
    wpa-ssid "My SSID"
    wpa-passphrase "My Passphrase"

    I have added a static IP address configuration line for the eth0 interface also, so that in case someday I connect my RPi to physical connection I will just bring my eth0 interface up and have an IP address. The reason I have commented the “auto eth0” line is because in case a physical interface is up, the default route of the system is always through the physical interface i.e eth0 in this case. So, if my WiFi is up, I want my packets to go in/out through WiFi by default and not through “eth0” (by the way it does not matter if you have connected the cable physically or not, if the physical interface is up, it is the default route out). Of-course we can prevent that, but it is going to be a little bit complicated, so we are going to just comment out auto line to make sure that the “eth0” does not come up. It is also possible to have both “eth0” and “wlan0” run simultaneously, but again it is a bit complicated for this post and I do not need that anyway.

    Now you can restart the networking or reboot the RPi and your WiFi should come up with the static IP address.

  • Creating a DEB package for Oracle Java

    Linux based operating systems comes by default with Open JDK installations. Often it is necessary for various developmental needs to install the Oracle Java. Oracle only supplies two installations of Java for Linux based operating systems – a rpm and a tar.gz binary distribution.

    For RPM based distributions it is fairly easy to have the uniform setup on a large farm of servers, but on DEB based distributions a lot of manual work needs to be done at each host after unpacking the tar.gz file such as updating the alternatives etc to make the Oracle Java a default Java installation.

    I have been thinking about how to deploy Oracle Java SDK on multiple Debian servers in a standardized way i.e by creating a DEB file.

    A search on Debian Packages revealed the existence of a tool called – “make-jpkg”, a part of “java-package” package. This tool is capable of creating a DEB package from this tar.gz file. Here is how I created the package –

    $ sudo apt-get install fakeroot java-package

    I downloaded the Oracle Java Standard Edition  on my Linux Mint Debian Edition (LMDE) virtual machine.

    Next I ran the command –

    $ fakeroot make-jpkg --full-name "Ajitabh Pandey" --email "ajitabh@unixclinic.com" /home/ajitabhp/Downloads/jdk-7u25-linux-x64.tar.gz

    I got an error stating “No Matching Plugin was found”

    Just above this error message the plugin path was given for various plugins used by this utility – “make-jpkg”. The plugins were in /usr/share/java-package directory in the form of “.sh” files (shell scripts). I next opened each shell script to try and decipher them and found the possible problem in the plugins “/usr/share/java-package/oracle-j2*.sh”. The following pattern picked up from “/usr/share/java-package/oracle-j2sdk.sh” was the culprit –

    "jdk-7u"[0-9]"-linux-x64.tar.gz") # SUPPORTED
    j2se_version=1.7.0+update${archive_name:6:1}${revision}
    j2se_expected_min_size=180 #Mb
    j2se_priority=317
    found=true
    ;;

    If you see this pattern, it clearly indicates that it is only supporting up to update 9 of the JDK and the JDK I downloaded was update 25. So I added the following lines just below the above lines to add the support for my version.

    "jdk-7u"[0-9][0-9]"-linux-x64.tar.gz") # SUPPORTED
    j2se_version=1.7.0+update${archive_name:6:2}${revision}
    j2se_expected_min_size=180 #Mb
    j2se_priority=317
    found=true
    ;;

    There are two differences, one in first line and the second in second line. I am sure you will be able to spot them and decipher them.

    After making similar changes in the other oracle* files I ran the make-jpkg as mentioned above and it created a DEB file – oracle-j2sdk1.7_1.7.0+update25_amd64.deb, which is deploy-able with the usual “dpkg -i”.

    Changing the Default Java Installation to the Oracle Installation

    After installing the package, you may want to change some alternatives in order to make the Oracle JDK and associated JRE installations as defaults. As the default version of Java may be something different. You can check the current version of java and its provider by –

    $ java -version
    java version "1.6.0_24"
    OpenJDK Runtime Environment (IcedTea6 1.11.5) (6b24-1.11.5-1)
    OpenJDK 64-Bit Server VM (build 20.0-b12, mixed mode)
    $ file `which java`
    /usr/bin/java: symbolic link to `/etc/alternatives/java'
    $ ls -l /etc/alternatives/java
    lrwxrwxrwx 1 root root 46 Aug 16 20:18 /etc/alternatives/java -> /usr/lib/jvm/java-6-openjdk-amd64/jre/bin/java

    First find out the name of the available installations –

    $ /usr/sbin/update-java-alternatives -l
    j2sdk1.7-oracle 317 /usr/lib/jvm/j2sdk1.7-oracle
    java-1.6.0-openjdk-amd64 1061 /usr/lib/jvm/java-1.6.0-openjdk-amd64

    We will switch our default Java to “j2sdk1.7-oracle” with the following command –

    $ sudo /usr/sbin/update-java-alternatives -s j2sdk1.7-oracle

    Now you can check your Java version by

    $ java -version
    java version "1.7.0_25"
    Java(TM) SE Runtime Environment (build 1.7.0_25-b15)
    Java HotSpot(TM) 64-Bit Server VM (build 23.25-b01, mixed mode)
    $ file `which java`
    /usr/bin/java: symbolic link to `/etc/alternatives/java'
    $ ls -l /etc/alternatives/java
    lrwxrwxrwx 1 root root 41 Aug 16 20:22 /etc/alternatives/java -> /usr/lib/jvm/j2sdk1.7-oracle/jre/bin/java