Ajitabh Pandey's Soul & Syntax

Exploring systems, souls, and stories – one post at a time

Tag: Tech Insights

  • Why Systemd Timers Outshine Cron Jobs

    For decades, cron has been the trusty workhorse for scheduling tasks on Linux systems. Need to run a backup script daily? cron was your go-to. But as modern systems evolve and demand more robust, flexible, and integrated solutions, systemd timers have emerged as a superior alternative. Let’s roll up our sleeves and dive into the strategic advantages of systemd timers, then walk through their design and implementation..

    Why Ditch Cron? The Strategic Imperative

    While cron is simple and widely understood, it comes with several inherent limitations that can become problematic in complex or production environments:

    • Limited Visibility and Logging: cron offers basic logging (often just mail notifications) and lacks a centralized way to check job status or output. Debugging failures can be a nightmare.
    • No Dependency Management: cron jobs are isolated. There’s no built-in way to ensure one task runs only after another has successfully completed, leading to potential race conditions or incomplete operations.
    • Missed Executions on Downtime: If a system is off during a scheduled cron run, that execution is simply missed. This is critical for tasks like backups or data synchronization.
    • Environment Inconsistencies: cron jobs run in a minimal environment, often leading to issues with PATH variables or other environmental dependencies that work fine when run manually.
    • No Event-Based Triggering: cron is purely time-based. It cannot react to system events like network availability, disk mounts, or the completion of other services.
    • Concurrency Issues: cron doesn’t inherently prevent multiple instances of the same job from running concurrently, which can lead to resource contention or data corruption.

    systemd timers, on the other hand, address these limitations by leveraging the full power of the systemd init system. (We’ll dive deeper into the intricacies of the systemd init system itself in a future post!)

    • Integrated Logging with Journalctl: All output and status information from systemd timer-triggered services are meticulously logged in the systemd journal, making debugging and monitoring significantly easier (journalctl -u your-service.service).
    • Robust Dependency Management: systemd allows you to define intricate dependencies between services. A timer can trigger a service that requires another service to be active, ensuring proper execution order.
    • Persistent Timers (Missed Job Handling): With the Persistent=true option, systemd timers will execute a missed job immediately upon system boot, ensuring critical tasks are never truly skipped.
    • Consistent Execution Environment: systemd services run in a well-defined environment, reducing surprises due to differing PATH or other variables. You can explicitly set environment variables within the service unit.
    • Flexible Triggering Mechanisms: Beyond simple calendar-based schedules (like cron), systemd timers support monotonic timers (e.g., “5 minutes after boot”) and can be combined with other systemd unit types for event-driven automation.
    • Concurrency Control: systemd inherently manages service states, preventing multiple instances of the same service from running simultaneously unless explicitly configured to do so.
    • Granular Control: Timers offer second-resolution scheduling (with AccuracySec=1us), allowing for much more precise control than cron‘s minute-level resolution.
    • Randomized Delays: RandomizedDelaySec can be used to prevent “thundering herd” issues where many timers configured for the same time might all fire simultaneously, potentially overwhelming the system.

    Designing Your Systemd Timers: A Two-Part Harmony

    systemd timers operate in a symbiotic relationship with systemd service units. You typically create two files for each scheduled task:

    1. A Service Unit (.service file): This defines what you want to run (e.g., a script, a command).
    2. A Timer Unit (.timer file): This defines when you want the service to run.

    Both files are usually placed in /etc/systemd/system/ for system-wide timers or ~/.config/systemd/user/ for user-specific timers.

    The Service Unit (your-task.service)

    This file is a standard systemd service unit. A basic example:

    [Unit]
    Description=My Daily Backup Service
    Wants=network-online.target # Optional: Ensure network is up before running
    
    [Service]
    Type=oneshot # For scripts that run and exit
    ExecStart=/usr/local/bin/backup-script.sh # The script to execute
    User=youruser # Run as a specific user (optional, but good practice)
    Group=yourgroup # Run as a specific group (optional)
    # Environment="PATH=/usr/local/bin:/usr/bin:/bin" # Example: set a custom PATH
    
    [Install]
    WantedBy=multi-user.target # Not strictly necessary for timers, but good for direct invocation
    

    Strategic Design Considerations for Service Units:

    • Type=oneshot: Ideal for scripts that perform a task and then exit.
    • ExecStart: Always use absolute paths for your scripts and commands to avoid environment-related issues.
    • User and Group: Run services with the least necessary privileges. This enhances security.
    • Dependencies (Wants, Requires, After, Before): Leverage systemd‘s powerful dependency management. For example, Wants=network-online.target ensures the network is active before the service starts.
    • Error Handling within Script: While systemd provides good logging, your scripts should still include robust error handling and exit with non-zero status codes on failure.
    • Output: Direct script output to stdout or stderr. journald will capture it automatically. Avoid sending emails directly from the script unless absolutely necessary; systemd‘s logging is usually sufficient.

    The Timer Unit (your-task.timer)

    This file defines the schedule for your service.

    [Unit]
    Description=Timer for My Daily Backup Service
    Requires=your-task.service # Ensure the service unit is loaded
    After=your-task.service # Start the timer after the service is defined
    
    [Timer]
    OnCalendar=daily # Run every day at midnight (default for 'daily')
    # OnCalendar=*-*-* 03:00:00 # Run every day at 3 AM
    # OnCalendar=Mon..Fri 18:00:00 # Run weekdays at 6 PM
    # OnBootSec=5min # Run 5 minutes after boot
    Persistent=true # If the system is off, run immediately on next boot
    RandomizedDelaySec=300 # Add up to 5 minutes of random delay to prevent stampedes
    
    [Install]
    WantedBy=timers.target # Essential for the timer to be enabled at boot
    

    Strategic Design Considerations for Timer Units:

    • OnCalendar: This is your primary scheduling mechanism. systemd offers a highly flexible calendar syntax (refer to man systemd.time for full details). Use systemd-analyze calendar "your-schedule" to test your expressions.
    • OnBootSec: Useful for tasks that need to run a certain duration after the system starts, regardless of the calendar date.
    • Persistent=true: Crucial for reliability! This ensures your task runs even if the system was powered off during its scheduled execution time. The task will execute once systemd comes back online.
    • RandomizedDelaySec: A best practice for production systems, especially if you have many timers. This spreads out the execution of jobs that might otherwise all start at the exact same moment.
    • AccuracySec: Defaults to 1 minute. Set to 1us for second-level precision if needed (though 1s is usually sufficient).
    • Unit: This explicitly links the timer to its corresponding service unit.
    • WantedBy=timers.target: This ensures your timer is enabled and started automatically when the system boots.

    Implementation and Management

    1. Create the files: Place your .service and .timer files in /etc/systemd/system/.
    2. Reload systemd daemon: After creating or modifying unit files: sudo systemctl daemon-reload
    3. Enable the timer: This creates a symlink so the timer starts at boot: sudo systemctl enable your-task.timer
    4. Start the timer: This activates the timer for the current session: sudo systemctl start your-task.timer
    5. Check status: sudo systemctl status your-task.timer; sudo systemctl status your-task.service
    6. View logs: journalctl -u your-task.service
    7. Manually trigger the service (for testing): sudo systemctl start your-task.service

    Conclusion

    While cron served its purpose admirably for many years, systemd timers offer a modern, robust, and integrated solution for scheduling tasks on Linux systems. By embracing systemd timers, you gain superior logging, dependency management, missed-job handling, and greater flexibility, leading to more reliable and maintainable automation. It’s a strategic upgrade that pays dividends in system stability and ease of troubleshooting. Make the switch and experience the power of a truly systemd-native approach to scheduled tasks.

  • The Data Dilemma: Mastering Recovery for Stateful Applications

    Welcome back to “The Unseen Heroes” series! In our last post, we celebrated the “forgetful champions”—stateless applications—and how their lack of memory makes them incredibly agile and easy to recover. Today, we’re tackling their more complex cousins: stateful applications. These are the digital equivalent of that friend who remembers everything—your coffee order from three years ago, that embarrassing story from high school, and every single detail of your last conversation. And while that memory is incredibly useful, it makes recovery a whole different ballgame.

    The Memory Keepers: What Makes Stateful Apps Tricky?

    Unlike their stateless counterparts, stateful applications are designed to remember things. They preserve client session information, transaction details, or persistent data on the server side between requests. They retain context about past interactions, often storing this crucial information in a database, a distributed memory system, or even on local drives.  

    Think of it like this:

    • Your online shopping cart: When you add items, close your browser, and come back later, your items are still there. That’s a stateful application remembering your session.
    • A multiplayer online game: The game needs to remember your character’s progress, inventory, and position in the world, even if you log out and back in.
    • A database: The ultimate memory keeper, storing all your critical business data persistently.

    This “memory” is incredibly powerful, but it introduces a unique set of challenges for automated recovery:

    • State Management is a Headache: Because they remember, stateful apps need meticulous coordination to ensure data integrity and consistency during updates or scaling operations. It’s like trying to keep a dozen meticulous librarians perfectly in sync, all updating the same book at the same time.  
    • Data Persistence is Paramount: Containers, by nature, are ephemeral—they’re designed to be temporary. Any data stored directly inside a container is lost when it vanishes. Stateful applications, however, need their data to live on, requiring dedicated persistent storage solutions like databases or distributed file systems.  
    • Scalability is a Puzzle: Scaling stateful systems horizontally is much harder than stateless ones. You can’t just spin up a new instance and expect it to know everything. It requires sophisticated data partitioning, robust synchronization methods, and careful management of shared state across instances.  
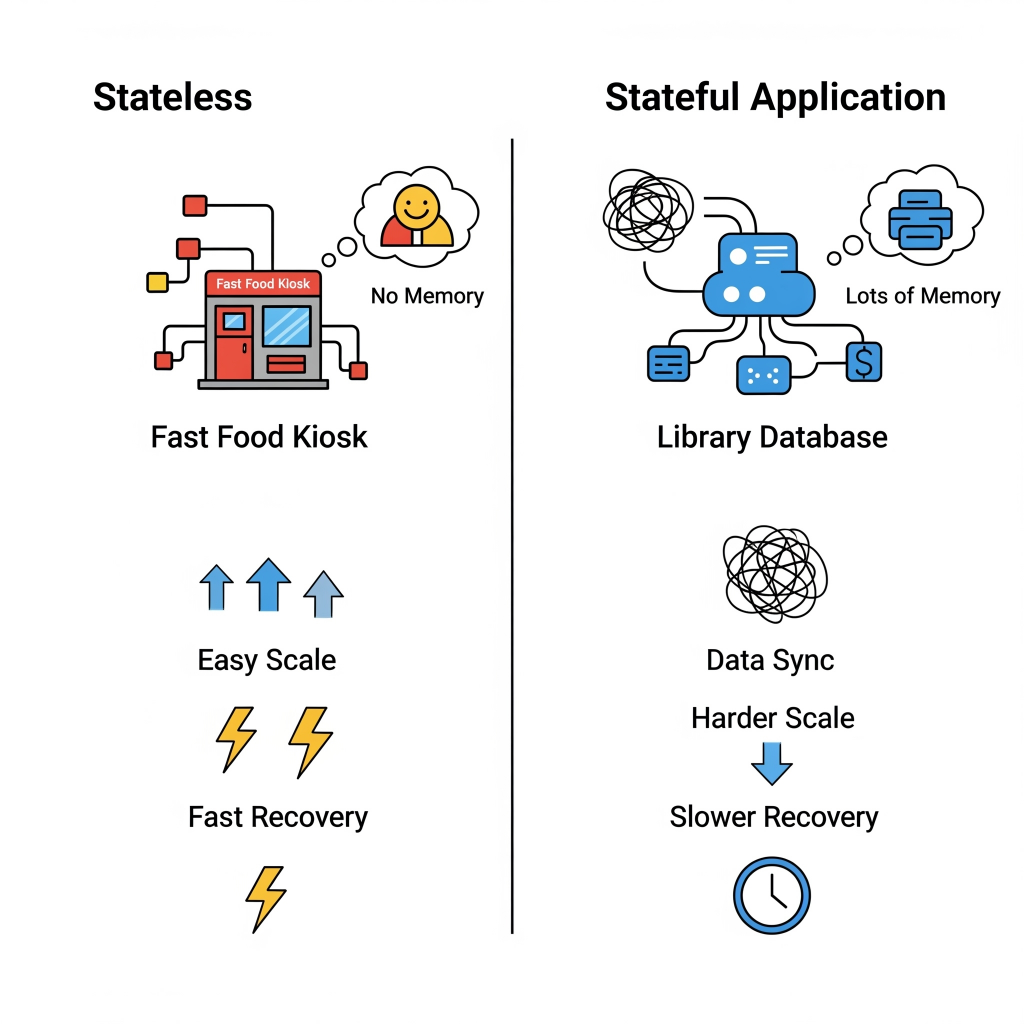
    • Recovery Time is Slower: The recovery process for stateful applications is generally more complex and time-consuming. It often involves promoting a secondary replica to primary and may require extensive data synchronization to restore the correct state. We’re talking seconds to minutes for well-optimized systems, but it can be longer if extensive data synchronization is needed.

    The following image visually contrast the simplicity of stateless recovery with the inherent complexities of stateful recovery, emphasizing the challenges.

    The Art of Copying: Data Replication Strategies

    Since data is the heart of a stateful application, making copies—or data replication—is absolutely critical. This means creating and maintaining identical copies of your data across multiple locations to ensure it’s always available, reliable, and fault-tolerant. It’s like having multiple identical copies of a priceless historical document, stored in different vaults.  

    The replication process usually involves two main steps:

    1. Data Capture: Recording changes made to the original data (e.g., by looking at transaction logs or taking snapshots).
    2. Data Distribution: Sending those captured changes to the replica systems, which might be in different data centers or even different geographical regions.  

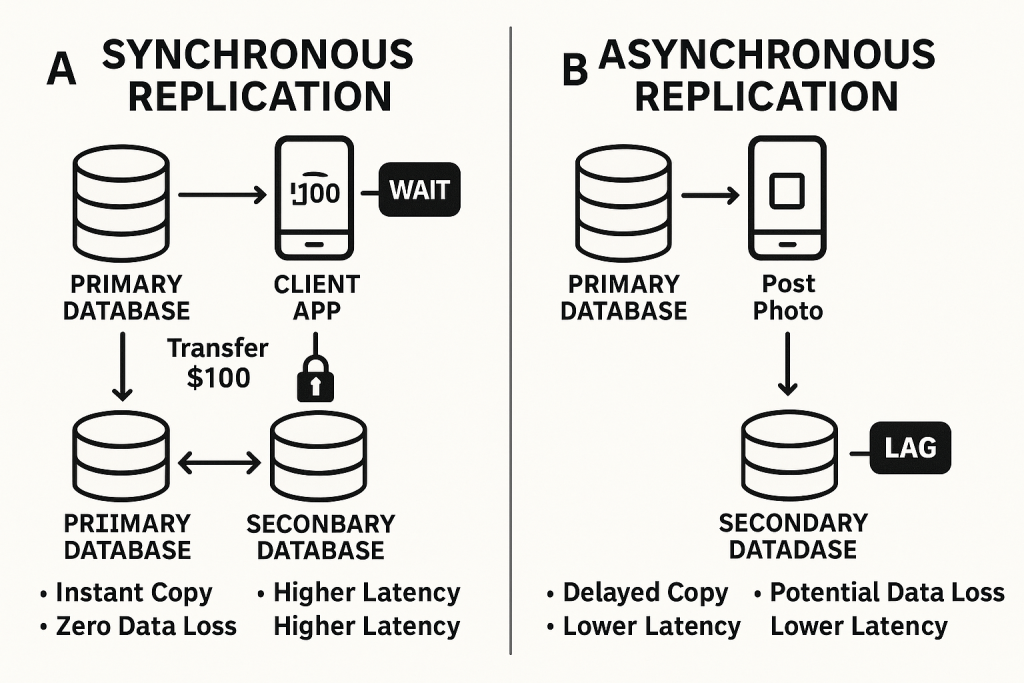
    Now, not all copies are made equal. The biggest decision in data replication is choosing between synchronous and asynchronous replication, which directly impacts your RPO (how much data you can lose), cost, and performance.

    Synchronous Replication: The “Wait for Confirmation” Method

    How it works: Data is written to both the primary storage and the replica at the exact same time. The primary system won’t confirm the write until both copies are updated.

    The Good: Guarantees strong consistency (zero data loss, near-zero RPO) and enables instant failover. This is crucial for high-stakes applications like financial transaction processing, healthcare systems, or e-commerce order processing where losing even a single record is a disaster.  

    The Catch: It’s generally more expensive, introduces latency (it slows down the primary application because it has to wait), and is limited by distance (typically up to 300 km). Imagine two people trying to write the same sentence on two whiteboards at the exact same time, and neither can move on until both are done. It’s precise, but slow if they’re far apart.

    Asynchronous Replication: The “I’ll Catch Up Later” Method

    How it works: Data is first written to the primary storage, and then copied to the replica at a later time, often in batches.

    The Good: Less costly, can work effectively over long distances, and is more tolerant of network hiccups because it doesn’t demand real-time synchronization. Great for disaster recovery sites far away.  

    The Catch: Typically provides eventual consistency, meaning replicas might temporarily serve slightly older data. This results in a non-zero RPO (some data loss is possible). It’s like sending a copy of your notes to a friend via snail mail – they’ll get them eventually, but they won’t be perfectly up-to-date in real-time.

    The above diagram clearly illustrates the timing, consistency, and trade-offs of synchronous vs. asynchronous replications.

    Beyond synchronous and asynchronous, there are various specific replication strategies, each with its own quirks:

    • Full Table Replication: Copying the entire database. Great for initial setup or when you just need a complete snapshot, but resource-heavy.  
    • Log-Based Incremental Replication: Only copying the changes recorded in transaction logs. Efficient for real-time updates, but specific to certain databases.  
    • Snapshot Replication: Taking a point-in-time “photo” of the data and replicating that. Good for smaller datasets or infrequent updates, but not real-time.  
    • Key-Based Incremental Replication: Copying changes based on a specific column (like an ID or timestamp). Efficient, but might miss deletions.  
    • Merge Replication: Combining multiple databases, allowing changes on all, with built-in conflict resolution. Complex, but offers continuity.  
    • Transactional Replication: Initially copying all data, then mirroring changes sequentially in near real-time. Good for read-heavy systems.  
    • Bidirectional Replication: Two databases actively exchanging data, with no single “source.” Great for full utilization, but high conflict risk.  

    The key takeaway here is that for stateful applications, you’ll likely use a tiered replication strategy, applying synchronous methods for your most mission-critical data (where zero RPO is non-negotiable) and asynchronous for less time-sensitive workloads.  

    Orchestrating the Chaos: Advanced Consistency & Failover

    Simply copying data isn’t enough. Stateful applications need sophisticated conductors to ensure everything stays in tune, especially during a crisis.

    Distributed Consensus Algorithms

    These are the “agreement protocols” for your distributed system. Algorithms like Paxos and Raft help disparate computers agree on critical decisions, even if some nodes fail or get disconnected. They’re vital for maintaining data integrity and consistency across the entire system, especially during failovers or when a new “leader” needs to be elected in a database cluster.

    Kubernetes StatefulSets

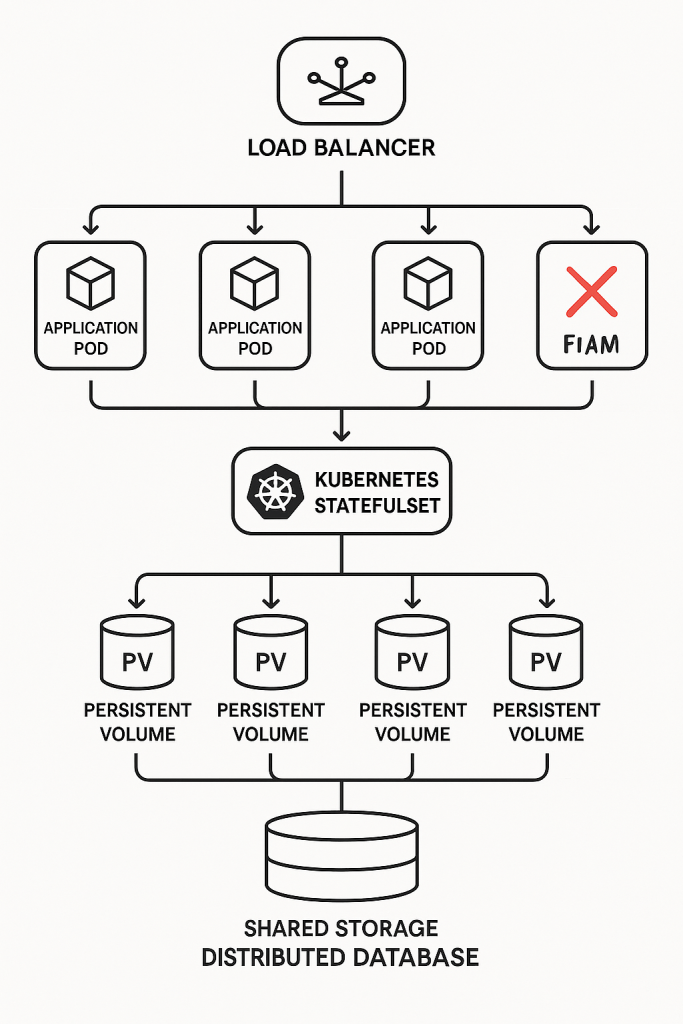
    For stateful applications running in containers (like databases or message queues), Kubernetes offers StatefulSets. These are specifically designed to manage stateful workloads, providing stable, unique network identifiers and, crucially, persistent storage for each Pod (your containerized application instance).

    • Persistent Volumes (PVs) & Persistent Volume Claims (PVCs): StatefulSets work hand-in-hand with PVs and PVCs, which are Kubernetes’ way of providing dedicated, durable storage that persists even if the Pod restarts or moves to a different node. This means your data isn’t lost when a container dies.
    • The Catch (again): While StatefulSets are powerful, Kubernetes itself doesn’t inherently provide data consistency or transactional guarantees. That’s still up to your application or external tools. Also, disruptions to StatefulSets can take longer to resolve than for stateless Pods, and Kubernetes doesn’t natively handle backup and disaster recovery for persistent storage, so you’ll need third-party solutions.

      Decoupling State and Application Logic

      This is a golden rule for modern stateful apps. Instead of having your application directly manage its state on local disks, you separate the application’s core logic (which can be stateless!) from its persistent data. The data then lives independently in dedicated, highly available data stores like managed databases or caching layers. This allows your application instances to remain ephemeral and easily replaceable, while the complex job of state management, replication, and consistency is handled by specialized data services. It’s like having a separate, highly secure vault for your important documents, rather than keeping them scattered in every office.

      So, while stateful applications bring a whole new level of complexity to automated recovery, the good news is that modern architectural patterns and cloud-native tools provide powerful ways to manage their “memory” and ensure data integrity and availability during failures. It’s about smart design, robust replication, and leveraging the right tools for the job.

      In our next blog post, we’ll zoom out and look at the cross-cutting components that are essential for any automated recovery framework, whether you’re dealing with stateless or stateful apps. We’ll talk about monitoring, Infrastructure as Code, and the different disaster recovery patterns. Stay tuned!