Ajitabh Pandey's Soul & Syntax

Exploring systems, souls, and stories – one post at a time

Tag: RaspberryPi

  • When Pi-hole + Unbound Stop Resolving: A DNSSEC Trust Anchor Fix

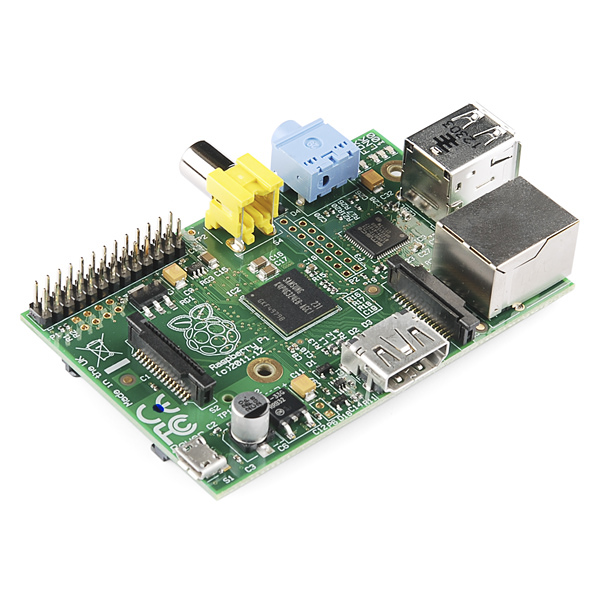
    I have my own private DNS setup in my home network, powered by Pi-hole running on my very first Raspberry Pi, a humble Model B Rev 2. It’s been quietly handling ad-blocking and DNS resolution for years. But today, something broke.

    I noticed that none of my devices could resolve domain names. Pi-hole’s dashboard looked fine. The DNS service was running, blocking was active, but every query failed. Even direct dig queries returned SERVFAIL. Here’s how I diagnosed and resolved the issue.

    The Setup

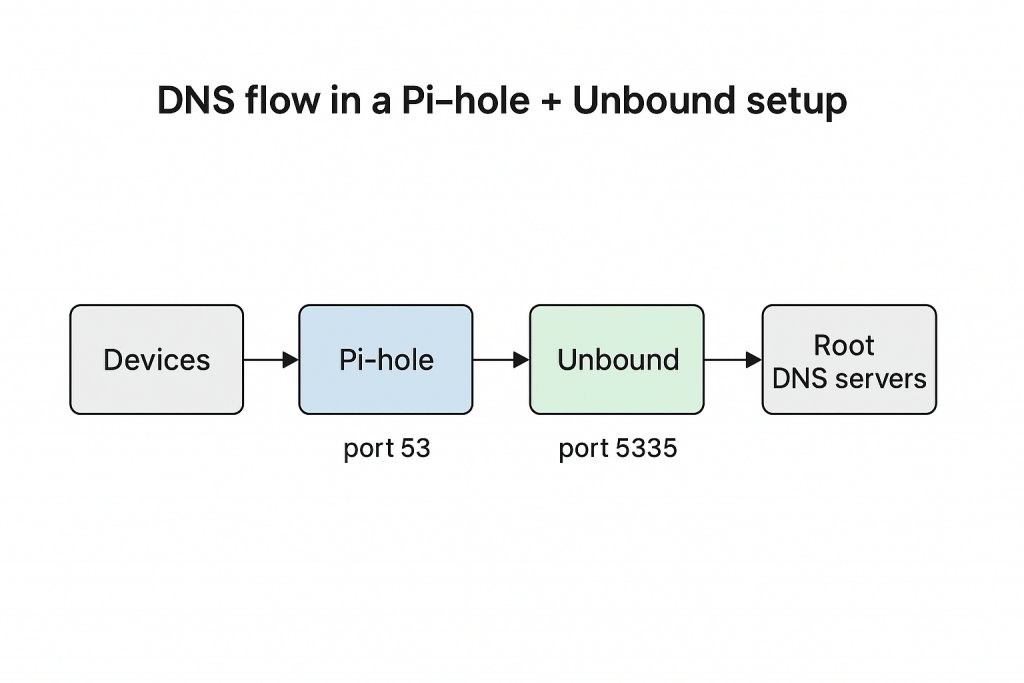
    My Pi-hole forwards DNS queries to Unbound, a recursive DNS resolver running locally on port 5335. This is configured in /etc/pihole/setupVars.conf.

    PIHOLE_DNS_1=127.0.0.1#5335
    PIHOLE_DNS_2=127.0.0.1#5335

    And my system’s /etc/resolv.conf points to Pi-hole itself

    nameserver 127.0.0.1

    Unbound is installed with the dns-root-data package, which provides root hints and DNSSEC trust anchors:

    $ dpkg -l dns-root-data|grep ^ii
    ii dns-root-data 2024041801~deb11u1 all DNS root hints and DNSSEC trust anchor

    The Symptoms

    Despite everything appearing normal, DNS resolution failed:

    $ dig google.com @127.0.0.1 -p 5335

    ;; ->>HEADER<<- opcode: QUERY, status: SERVFAIL

    Even root-level queries failed:

    $ dig . @127.0.0.1 -p 5335

    ;; ->>HEADER<<- opcode: QUERY, status: SERVFAIL

    Unbound was running and listening:

    $ netstat -tulpn | grep 5335

    tcp 0 0 127.0.0.1:5335 0.0.0.0:* LISTEN 29155/unbound

    And outbound connectivity was fine. I pinged one of the root DNS servers directly to ensure this:

    $ ping -c1 198.41.0.4 
    PING 198.41.0.4 (198.41.0.4) 56(84) bytes of data.
    64 bytes from 198.41.0.4: icmp_seq=1 ttl=51 time=206 ms

    --- 198.41.0.4 ping statistics ---
    1 packets transmitted, 1 received, 0% packet loss, time 0ms
    rtt min/avg/max/mdev = 205.615/205.615/205.615/0.000 ms

    The Diagnosis

    At this point, I suspected a DNSSEC validation failure. Unbound uses a trust anchor, which is simply a cryptographic key stored in root.key. This cryptographic key is used to verify the authenticity of DNS responses. Think of it like a passport authority: when you travel internationally, border agents trust your passport because it was issued by a recognized authority. Similarly, DNSSEC relies on a trusted key at the root of the DNS hierarchy to validate every response down the chain. If that key is missing, expired, or corrupted, Unbound can’t verify the authenticity of DNS data — and like a border agent rejecting an unverified passport, it simply refuses to answer, returning SERVFAIL.

    Even though dns-root-data was installed, the trust anchor wasn’t working.

    The Fix

    I regenerated the trust anchor manually:

    $ sudo rm /usr/share/dns/root.key
    $ sudo unbound-anchor -a /usr/share/dns/root.key
    $ sudo systemctl restart unbound

    After this, Unbound started resolving again:

    $ dig google.com @127.0.0.1 -p 5335

    ;; ->>HEADER<<- opcode: QUERY, status: NOERROR
    ;; ANSWER SECTION:
    google.com. 300 IN A 142.250.195.78

    Why This Happens

    Even with dns-root-data, the trust anchor could become stale — especially if the system missed a rollover event or the file was never initialized. Unbound doesn’t log this clearly, so it’s easy to miss.

    Preventing Future Failures

    To avoid this in the future, I added a weekly cron job to refresh the trust anchor:

    0 3 * * 0 /usr/sbin/unbound-anchor -a /usr/share/dns/root.key

    And a watchdog script to monitor Unbound health:

    $ dig . @127.0.0.1 -p 5335 | grep -q 'status: NOERROR' || systemctl restart unbound

    This was a good reminder that even quiet systems need occasional maintenance. Pi-hole and Unbound are powerful together, but DNSSEC adds complexity. If you’re running a similar setup, keep an eye on your trust anchors, and don’t trust the dashboard alone.

  • Upgrading Raspbian 8 (Jessie) to Raspbian 9 (Stretch)

    I decided to upgrade my oldest Raspberry Pi to the latest Raspbian. Since I was two releases behind, I decided to do it step-by-step. Today I updated from 8 – 9. I plan. to perform similar steps to upgrade 9 – 10.

    Following are the quick sequence of steps I followed to perform the upgrade. This is a Model B Rev 2 Pi, so was considerably slow to update and took me more than 4 hours to complete.

    Step 1 – Prepare The System For Upgrade

    Apply the latest updates to the system.

    $ sudo apt update && sudo apt upgrade -y && sudo apt-get dist-upgrade -y

    Next step is to search for packages which have been only partially installed on the system using dpkg -C command.

    $ sudo dpkg -C

    The dpkg may indicate what needs to be done with these. I did not find anything under this category, which was good. In last, I ran apt-mark showhold command to get a list of all packages which have been marked as hold.

    $ sudo apt-mark showhold

    While I did not get any packages in this list, but if there are any, we are expected to resolve this before proceedig to step 2.

    Stpe 2 – Prepare the APT System for Upgrade

    $ sudo sed -i 's/jessie/stretch/g' /etc/apt/sources.list
    $ sudo sed -i 's/jessie/stretch/g' /etc/apt/sources.list.d/raspi.list
    $ echo 'deb http://archive.raspberrypi.org/debian/ stretch main' >> /etc/apt/sources.list

    I am updating only the two files but if your system has any other source files, then you need to update them appropriately as well. A list of such files can be found using – grep -lnr jessie /etc/apt

    In addition to this I also removed the package apt-listchange which displays what changed in the new version of the Debian package as compared to the version currently installed on the system. This is expected to speed-up the entire process. This is not mandatory, so you can skip it.

    # optional step
    $ sudo apt-get remove apt-listchange 

    Step 3 – Perform The Upgrade and Cleanup

    As a last step initiate the upgrade process. This is the time where you can just leave the system for few hours.

    $ sudo apt update && sudo apt upgrade -y && sudo apt-get dist-upgrade -y

    I faced issues with chromium-browser and at the last command (dist-upgrade), the dpkg bailed out with a message indicating archive corruption of chromium-browser package. Since I am at Run Level 3, and do not need chromium on the headless pi, I decided to remove the following three packages. In any case in the absence of chromium, the debian system will automatically use update-alternatives and choose epiphany-browser to satisfy gnome-www-browser requirement.

    $ sudo apt-get remove chromium-browser chromium-browser-l10n rpi-chromium-mods

    After removing the chromium browser, I did another round of update, upgrade and dist-upgrade, just to make sure before initiating the cleanup as below –

    $ sudo apt-get autoremove -y && sudo apt-get autoclean

    The new OS version can be verified by

    $ cat /etc/debian_version;cat /etc/os-release

    I also took this opportunity to update the firmware of the raspberry pi by running the following command. Please note this step is absolutely optional and it is recomended also that do not perform this unless you know what you are doing or you are being asked by a support person.

    $ sudo rpi-update

  • Raspberry Pi – rsyslog fixes on Raspbian 8 (Jessie)

    Raspberry Pi – rsyslog fixes on Raspbian 8 (Jessie)

    One of my Raspberry Pi (Raspberry Pi Model B Rev 2) is running quite old versio of Rasbian – although fully updated and patched. Today while checking the syslog on my raspberry pi, I noticed the following error which was very frequently – almost every minute and thus was filling up the syslog.

    Dec 24 20:59:35 rads rsyslogd-2007: action 'action 17' suspended, next retry is Thu Dec 24 21:01:05 2020 [try http://www.rsyslog.com/e/2007 ]

    Thanks to logrotate I was not in an immediate need for action, but still I thought it will be better to fix this – atleast that will reduce the write and increase life of my SD Card.

    The URL at the end of the message was very helpful. According to the specified URL this message simply means that rsyslog.conf contains the instruction to write to the xconsole pipe, but this pipe is never read. on editing the /etc/rsyslog file, the following section can be commented out or removed completely.

    daemon.*;mail.*;\        news.err;\        *.=debug;*.=info;\        *.=notice;*.=warn       |/dev/xconsole

    A simple systemctl restart rsyslog after that will fix the issue.

    I did not see this issue on my other Raspberry Pi which runs Raspbian based on Debian Buster (Debian 10). I checked the /etc/rsyslog.conf on that and could not find the offending lines there. So my understanding is that this issue is with Raspbian based on Jessie.

  • Apt Pinning in Raspbian

    Quite sometime back I wrote a blog entry on apt-pinning to mix multiple repositories in debian and prioritize them. Recently, I felt the need to do the same on my raspberry pi.

    I use rsnapshot to backup remote systems. Rsnapshot has an associated perl script which is meant to send beautiful reports via email at the end of the backup. The script in the version which came with raspbian was broken (1.3.1-4+deb8u1) and I needed 1.4.2-1, which is available in Debian Stretch.

    Following my earlier post, I performed the following steps to perform the installation of the required version without impacting the rest of the system. As you can see that the priority of Jessie is higher than that of Stretch, which will ensure that the system does not get messed up when you do an upgrade.

    # Create the preferences file for jessie and stretch as shown below
    $ sudo vi /etc/apt/preferences.d/jessie.pref
    Package: *
    Pin: release n=jessie
    Pin-Priority: 900
    
    $ sudo vi /etc/apt/preferences.d/stretch.pref
    Package: *
    Pin: release a=stretch
    Pin-Priority: 750
    
    # Define the package sources for both jessie and stretch
    $ sudo vi /etc/apt/sources.list.d/jessie.list
    deb http://mirrordirector.raspbian.org/raspbian/ jessie main contrib non-free rpi
    
    $ sudo vi /etc/apt/sources.list.d/stretch.list
    deb http://mirrordirector.raspbian.org/raspbian/ stretch main contrib non-free rpi
    
    # Refresh the cache and sources list
    $ sudo apt-get update
    
    # Install the desired package by specifying the repository from which 
    # it has to be installed
    $ sudo apt-get install rsnapshot -t stretch

    Please be careful before performing these steps in a production system.

  • Huawei E303c as Modem on Raspberry Pi

    I have a Huawei E303c USB modem, which I wanted to use with my Raspberry Pi so that I can connect my Pi to the Internet and run my local server. Now why would I want to do that when I have a broadband at home? Now those of you who are in India and uses ACT Broadband, which has recently become very popular in Southern India due to its fibre technology, may know that ACT uses Carrier-Grade NAT, as a result of which I do not have the public IP address and hence can not rely on port forwarding on my router.

    Here is how I configured the device. During this course, I referred to various other websites and at the bottom of this page, I have provided those as a reference.

    These UMTS modems consume a lot of power and hence it is recommended that these may be connected to a powered USB hub connected to the Pi.

    Configuring the USB Modem Device

    Connect the device to the USB port and issue the lsusb command after few seconds to check if the device has been detected –

    $ lsusb
    Bus 001 Device 008: ID 12d1:14fe Huawei Technologies Co., Ltd.

    Note down the device number, in this case 12d1:14fe
    If you see the dmesg at this point you will find that the device will be detected as a CDROM and a USB storage device and not a modem. I do not have the output as I forget to save it.

    We need to install usb-modeswitch package which helps in the switching of device mode from USB Storage to USB modem mode.

    $ sudo apt-get install usb-modeswitch
    $ sudo reboot
    $ lsusb
    Bus 001 Device 008: ID 12d1:1506 Huawei Technologies Co., Ltd. E398 LTE/UMTS/GSM Modem/Networkcard

    Make a note of the device number for future reference, we would need this number for TargetProduct value. In this case this is 12d1:1506. If you see this has been changed from the last time. Here the usb-modeswitch is active. The pi has detected my E303C as E398 but that’s alright.

    Now running dmesg will show the below which indicates that the modem is detected and configured –

    $ sudo dmesg | grep -i usb
    [ 0.593089] usbcore: registered new interface driver usbfs
    [ 0.598824] usbcore: registered new interface driver hub
    [ 0.604340] usbcore: registered new device driver usb
    [ 1.015352] usbcore: registered new interface driver smsc95xx
    [ 1.539943] dwc_otg 20980000.usb: DWC OTG Controller
    [ 1.546616] dwc_otg 20980000.usb: new USB bus registered, assigned bus number 1
    [ 1.555602] dwc_otg 20980000.usb: irq 32, io mem 0x00000000
    [ 1.573463] usb usb1: New USB device found, idVendor=1d6b, idProduct=0002
    [ 1.581919] usb usb1: New USB device strings: Mfr=3, Product=2, SerialNumber=1
    [ 1.590782] usb usb1: Product: DWC OTG Controller
    [ 1.597093] usb usb1: Manufacturer: Linux 4.1.18+ dwc_otg_hcd
    [ 1.604400] usb usb1: SerialNumber: 20980000.usb
    [ 1.611639] hub 1-0:1.0: USB hub found
    [ 1.623853] usbcore: registered new interface driver usb-storage
    [ 1.797393] usbcore: registered new interface driver usbhid
    [ 1.804559] usbhid: USB HID core driver
    [ 2.076207] usb 1-1: new high-speed USB device number 2 using dwc_otg
    [ 2.316814] usb 1-1: New USB device found, idVendor=0424, idProduct=9512
    [ 2.325540] usb 1-1: New USB device strings: Mfr=0, Product=0, SerialNumber=0
    [ 2.338687] hub 1-1:1.0: USB hub found
    [ 2.626257] usb 1-1.1: new high-speed USB device number 3 using dwc_otg
    [ 2.736724] usb 1-1.1: New USB device found, idVendor=0424, idProduct=ec00
    [ 2.745604] usb 1-1.1: New USB device strings: Mfr=0, Product=0, SerialNumber=0
    [ 2.844813] smsc95xx 1-1.1:1.0 eth0: register 'smsc95xx' at usb-20980000.usb-1.1, smsc95xx USB 2.0 Ethernet, b8:27:eb:c2:b6:99
    [ 2.956388] usb 1-1.2: new high-speed USB device number 4 using dwc_otg
    [ 3.086999] usb 1-1.2: New USB device found, idVendor=1a40, idProduct=0201
    [ 3.095927] usb 1-1.2: New USB device strings: Mfr=0, Product=1, SerialNumber=0
    [ 3.105228] usb 1-1.2: Product: USB 2.0 Hub [MTT]
    [ 3.114467] hub 1-1.2:1.0: USB hub found
    [ 3.416291] usb 1-1.2.3: new high-speed USB device number 5 using dwc_otg
    [ 3.527702] usb 1-1.2.3: New USB device found, idVendor=1058, idProduct=0748
    [ 3.536728] usb 1-1.2.3: New USB device strings: Mfr=1, Product=2, SerialNumber=5
    [ 3.547663] usb 1-1.2.3: Product: My Passport 0748
    [ 3.554208] usb 1-1.2.3: Manufacturer: Western Digital
    [ 3.561146] usb 1-1.2.3: SerialNumber: 57585331453233574A4C4432
    [ 3.617837] usb-storage 1-1.2.3:1.0: USB Mass Storage device detected
    [ 3.628629] scsi host0: usb-storage 1-1.2.3:1.0
    [ 3.716364] usb 1-1.2.4: new high-speed USB device number 6 using dwc_otg
    [ 3.837768] usb 1-1.2.4: New USB device found, idVendor=1058, idProduct=0702
    [ 3.846795] usb 1-1.2.4: New USB device strings: Mfr=1, Product=2, SerialNumber=3
    [ 3.857730] usb 1-1.2.4: Product: External HDD
    [ 3.864239] usb 1-1.2.4: Manufacturer: Western Digital
    [ 3.871169] usb 1-1.2.4: SerialNumber: 575843393037323139333433
    [ 3.924643] usb-storage 1-1.2.4:1.0: USB Mass Storage device detected
    [ 3.946315] scsi host1: usb-storage 1-1.2.4:1.0
    [ 4.037283] usb 1-1.2.5: new high-speed USB device number 7 using dwc_otg
    [ 4.159220] usb 1-1.2.5: New USB device found, idVendor=12d1, idProduct=1506
    [ 4.168316] usb 1-1.2.5: New USB device strings: Mfr=3, Product=2, SerialNumber=0
    [ 4.179397] usb 1-1.2.5: Product: HUAWEI Mobile
    [ 4.185712] usb 1-1.2.5: Manufacturer: HUAWEI
    [ 4.256197] usb-storage 1-1.2.5:1.4: USB Mass Storage device detected
    [ 4.282053] scsi host2: usb-storage 1-1.2.5:1.4
    [ 4.307321] usb-storage 1-1.2.5:1.5: USB Mass Storage device detected
    [ 4.329879] scsi host3: usb-storage 1-1.2.5:1.5
    [ 4.843019] usbcore: registered new interface driver cdc_ncm
    [ 4.868289] usbcore: registered new interface driver usbserial
    [ 4.966542] usbcore: registered new interface driver usbserial_generic
    [ 4.975231] usbserial: USB Serial support registered for generic
    [ 5.048437] usbcore: registered new interface driver cdc_wdm
    [ 5.209021] usbcore: registered new interface driver option
    [ 5.342683] usbserial: USB Serial support registered for GSM modem (1-port)
    [ 5.546749] huawei_cdc_ncm 1-1.2.5:1.1: cdc-wdm0: USB WDM device
    [ 5.555830] huawei_cdc_ncm 1-1.2.5:1.1 wwan0: register 'huawei_cdc_ncm' at usb-20980000.usb-1.2.5, Huawei CDC NCM device, 58:2c:80:13:92:63
    [ 5.741270] usbcore: registered new interface driver huawei_cdc_ncm
    [ 5.839357] usb 1-1.2.5: GSM modem (1-port) converter now attached to ttyUSB0
    [ 5.995187] usb 1-1.2.5: GSM modem (1-port) converter now attached to ttyUSB1
    [ 6.225904] usb 1-1.2.5: GSM modem (1-port) converter now attached to ttyUSB2

    Now we will look for the relevant device configurations in the sample config files which comes with the usb-modeswitch package and extract the file.

    $ tar -tvzf /usr/share/usb_modeswitch/configPack.tar.gz|grep "12d1:14fe"
    -rw-r--r-- root/root       155 2012-12-08 22:22 12d1:14fe
    $ tar -xvzf /usr/share/usb_modeswitch/configPack.tar.gz 12d1\:14fe
    12d1:14fe
    $ ls -l 12d1\:14fe
    -rw-r--r-- 1 ajitabhp ajitabhp 155 Dec  8  2012 12d1:14fe

    Checking the contents of this file will give me

    $ cat 12d1\:14fe 
    # T-Mobile NL (Huawei E352)
    
    TargetVendor=  0x12d1
    TargetProduct= 0x1506
    
    MessageContent="55534243123456780000000000000011062000000100000000000000000000"

    If you notice that the TargetProduct value of 0x1506 matches with the value we found earlier in the lsusb output after the reboot. Based on the contents of this file, we will now create a configuration file for the usb_modeswitch utility.

    $ sudo vi /etc/usb_modeswitch.d/12d1\:14fe
    
    # Huawei E303C 3G USB modem
    # usb_modeswitch configuration
    #
    DefaultVendor=0x12d1
    DefaultProduct=0x14fe
    
    TargetVendor=0x12d1
    TargetProduct=0x1506
    
    MessageContent="55534243123456780000000000000011062000000100000000000000000000"

    Configuring the Dialer

    I will use wvdial utility for dialing out to the internet –

    $ sudo apt-get install wvdial
    $ sudo vi /etc/wvdial.conf
    [Dialer Default]
    Init1 = ATZ
    Init2 = ATQ0 V1 E1 S0=0 &C1 &D2 +FCLASS=0
    Modem Type = Analog Modem
    Baud = 460800
    New PPPD = yes
    Modem = /dev/ttyUSB0
    ISDN = 0
    
    [Dialer t24]
    Modem Type = Analog Modem
    Modem = /dev/ttyUSB0
    ISDN = 0
    Stupid Mode = 1
    New PPPD = yes
    Init1 = ATZ
    Init2 = ATQ0 V1 E1 S0=0 &C1 &D2
    Init3 = AT+CGDCONT=1, "IP", "T24.Internet"
    Phone = *99#
    Username = xxxxxxxxxx
    Password = xxxxxxxxxx
    
    [Dialer tatadocomo]
    Modem Type = Analog Modem
    Modem = /dev/ttyUSB0
    ISDN = 0
    Stupid Mode = 1
    New PPPD = yes
    Init1 = ATZ
    Init2 = ATQ0 V1 E1 S0=0 &C1 &D2
    #Init2 = ATQ0 V1 E1 S0=0 &C1 &D2 +FCLASS=0
    Baud = 115200
    Phone = *99#
    Username = internet
    Password = internet
    

    The xxxxxxxxxx in one of the configurations above is my 10 digit mobile number for the SIM. I tried this with two different SIMs, hence you are seeing two entries. T24 in India is a rebranded Tata Docomo mobile service provider.

    Now connect to internet with one of the following (depending on which SIM has been connected –

    $ wvdial t24
    

    or

    $wvdial tatadocomo
    

    If you remove the USB dongle and then reconnect it, you may have to do the following in order to bring the device in the modem mode –

    $ sudo usb_modeswitch -c /etc/usb_modeswitch.d/12d1\:14fe

    Resources