Ajitabh Pandey's Soul & Syntax

Exploring systems, souls, and stories – one post at a time

Tag: Networking

  • From /etc/hosts to 127.0.0.53: A Sysadmin’s View on DNS Resolution

    If you’ve been managing systems since the days of AT&T Unix System V Release 3 (SVR3), you remember when networking was a manual affair. Name resolution often meant a massive, hand-curated /etc/hosts file and a prayer.

    As the Domain Name System (DNS) matured, the standard consolidated around a single, universally understood text file: /etc/resolv.conf. For decades, that file served us well. But the requirements of modern, dynamic networking, involving laptops hopping Wi-Fi SSIDs, complex VPN split-tunnels, and DNSSEC validation, forced a massive architectural shift in the Linux world, most notably in the form of systemd-resolved.

    Let’s walk through history, with hands-on examples, to see how we got here.

    AT&T SVR3: The Pre-DNS Era

    Released around 1987-88, SVR3 was still rooted in the hosts file model. The networking stacks were primitive, and TCP/IP was available but not always bundled. I still remember that around 1996-97, I used to install AT&T SVR3 version 4.2 using multiple 5.25-inch DSDD floppy disks, then, after installation, use another set of disks to install the TCP/IP stack. DNS support was not native, and we relied on /etc/hosts for hostname resolution. By SVR3.2, AT&T started shipping optional resolver libraries, but these were not standardized.

    # Example /etc/hosts file on SVR3
    127.0.0.1 localhost
    192.168.1.10 svr3box svr3box.local

    If DNS libraries were installed, /etc/resolv.conf could be used:

    # /etc/resolv.conf available when DNS libraries were installed
    nameserver 192.168.1.1
    domain corp.example.com

    dig did not exists then, and we used to use nslookup.

    nslookup svr3box
    Server: 192.168.1.1
    Address: 192.168.1.1#53

    Name: svr3box.corp.example.com
    Address: 192.168.1.10

    Solaris Bridging Classical and Modern

    When I was introduced to Sun Solaris around 2003-2005, I realized that DNS resolution was very well structured (at least compared to the SVR3 systems I had worked on earlier). Mostly, I remember working on Solaris 8 (with a few older SunOS 5.x systems). These systems required both /etc/resolv.conf and /etc/nsswitch.conf

    # /etc/nsswitch.conf
    hosts: files dns nis

    This /etc/nsswitch.conf had only the job of instructing the libc C library to look in /etc/hosts, then DNS, and then NIS. Of course, you can change the sequence.

    The /etc/resolv.conf defined the nameservers –

    nameserver 8.8.8.8
    nameserver 1.1.1.1
    search corp.example.com

    Solaris 11 introduced SMF (Service Management Facility), and this allowed the /etc/resolv.conf to auto-generate based on the SMF profile. Manual edits were discouraged, and we were learning to use:

    svccfg -s dns/client setprop config/nameserver=8.8.8.8
    svcadm refresh dns/client

    For me, this marked the shift from text files to managed services, although I did not work much on these systems.

    BSD Unix: Conservatism and Security

    The BSD philosophy is simplicity, transparency and security-first.

    FreeBSD and NetBSD still rely on /etc/resolv.conf file and the dhclient update the file automatically. This helps in very straightforward debugging.

    cat /etc/resolv.conf
    nameserver 192.168.1.2

    nslookup freebsd.org

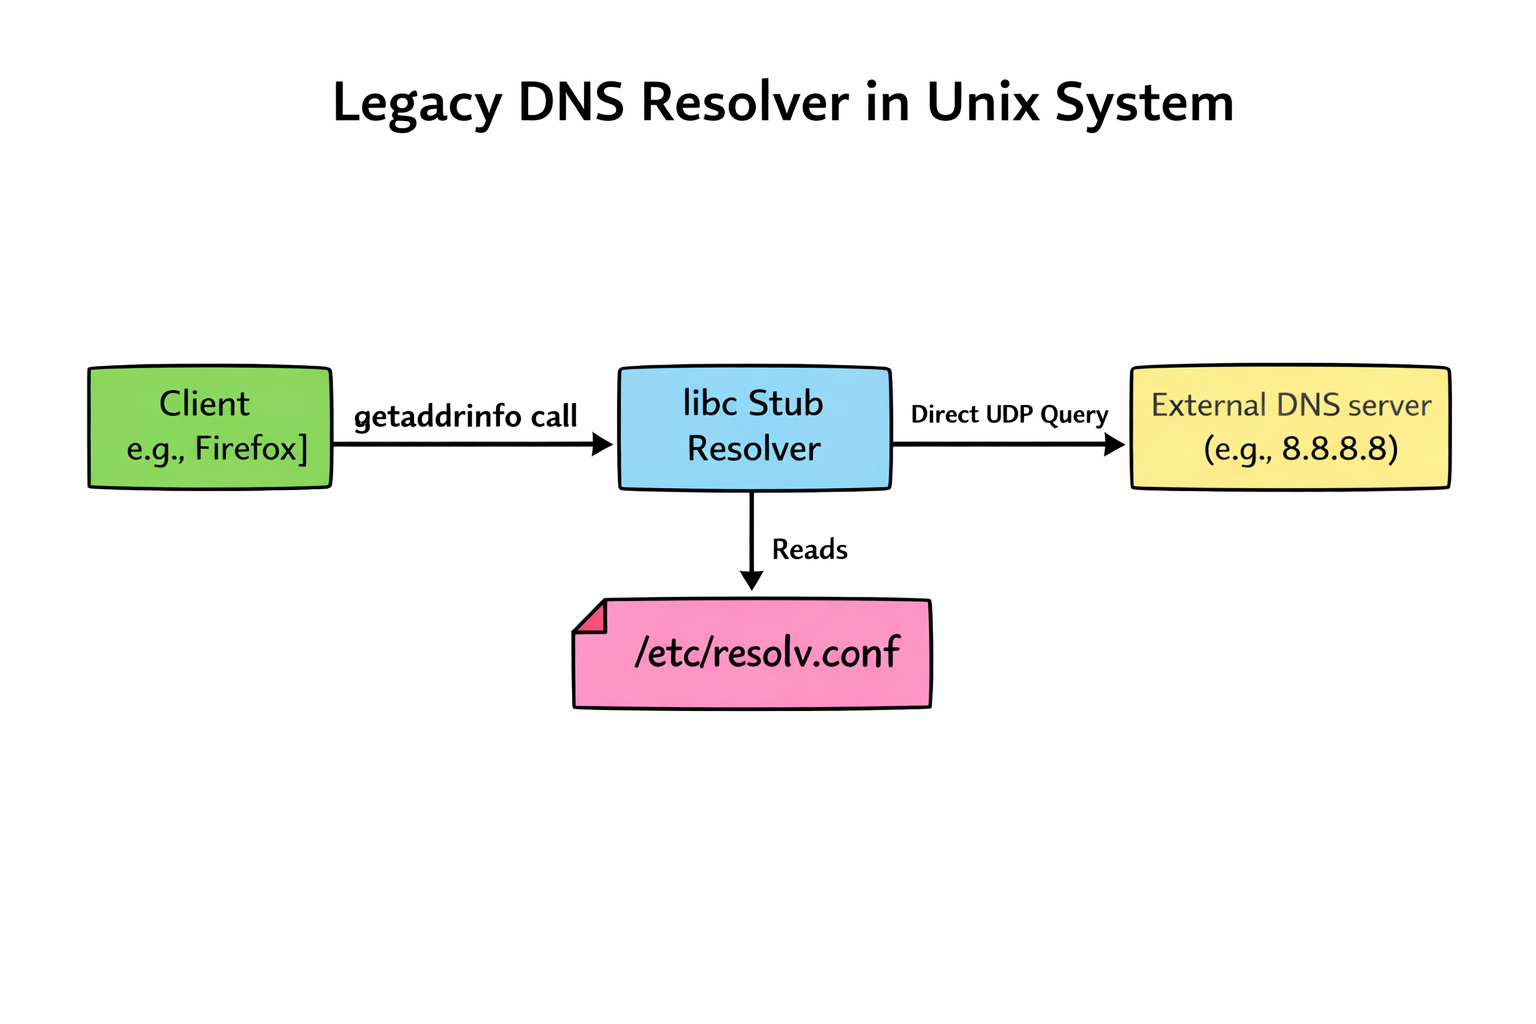
    OpenBSD, famous for its “secure by default” stance, includes modern, secure DNS software like unbound in its base installation; its default system resolution behavior remains classical. Unless the OS is explicitly configured to use a local caching daemon, applications on a fresh OpenBSD install still read /etc/resolv.conf and talk directly to external servers. They prioritize a simple, auditable baseline over complex automated magic.

    The Modern Linux Shift

    On modern Linux distributions (Ubuntu 18.04+, Fedora, RHEL 8+, etc.), the old way of simply “echoing” a nameserver into a static /etc/resolv.conf file is effectively dead. The reason for this is that the old model couldn’t handle race conditions. If NetworkManager, a VPN client, and a DHCP client all tried to write to that single file at the same time, the last one to write won.

    In modern linux systems, systemd-resolved acts as a local middleman, a DNS broker that manages configurations from different sources dynamically. The /etc/resolv.conf file is no longer a real file; it’s usually a symbolic link pointing to a file managed by systemd that directs local traffic to a local listener on 127.0.0.53.

    systemd-resolved adds features like –

    • Split-DNS to help route VPN domains seperately.
    • Local-Caching for faster repeated lookups.
    • DNS-over-TLS for encrypted queries.
    ls -l /etc/resolv.conf
    lrwxrwxrwx 1 root root 39 Dec 24 11:00 /etc/resolv.conf -> ../run/systemd/resolve/stub-resolv.conf

    This complexity buys us features needed for modern mobile computing: per-interface DNS settings, local caching to speed up browsing, and seamless VPN integration.

    The modern linux systems uses dig and resolvectl for diagnostics:

    $ dig @127.0.0.53 example.com

    ; <<>> DiG 9.16.50-Raspbian <<>> @127.0.0.53 example.com
    ; (1 server found)
    ;; global options: +cmd
    ;; Got answer:
    ;; ->>HEADER<<- opcode: QUERY, status: NOERROR, id: 17367
    ;; flags: qr rd ra; QUERY: 1, ANSWER: 2, AUTHORITY: 0, ADDITIONAL: 1

    ;; OPT PSEUDOSECTION:
    ; EDNS: version: 0, flags:; udp: 1232
    ;; QUESTION SECTION:
    ;example.com. IN A

    ;; ANSWER SECTION:
    example.com. 268 IN A 104.18.27.120
    example.com. 268 IN A 104.18.26.120

    ;; Query time: 9 msec
    ;; SERVER: 127.0.0.53#53(127.0.0.53)
    ;; WHEN: Wed Dec 24 12:49:43 IST 2025
    ;; MSG SIZE rcvd: 72

    $ resolvectl query example.com
    example.com: 2606:4700::6812:1b78
    2606:4700::6812:1a78
    104.18.27.120
    104.18.26.120

    -- Information acquired via protocol DNS in 88.0ms.
    -- Data is authenticated: no; Data was acquired via local or encrypted transport: no
    -- Data from: network

    Because editing the file directly no longer works reliably, we must use tools that communicate with the systemd-resolved daemon.

    Suppose you want to force your primary ethernet interface (eth0) to bypass DHCP DNS and use Google’s servers temporarily:

    sudo systemd-resolve --set-dns=8.8.8.8 --set-dns=8.8.4.4 --interface=eth0

    To check what is actually happening—seeing which DNS servers are bound to which interface scopes—run:

    systemd-resolve --status

    and to clear the manual overrides and go back to whatever setting DHCP provided:

    sudo systemd-resolve --revert --interface=eth0

    We’ve come a long way from System V R3. While the simplicity of the classical text-file approach is nostalgic for those of us who grew up on it, the dynamic nature of today’s networking requires a smarter local resolver daemon. It adds complexity, but it’s the price we pay for seamless connectivity in a mobile world.

  • From Cloud Abstraction to Bare Metal Reality: Understanding the Foundation of Hyperscale Infrastructure

    In today’s cloud-centric world, where virtual machines and containers seem to materialize on demand, it’s easy to overlook the physical infrastructure that makes it all possible. For the new generation of engineers, a deeper understanding of what it takes to build and manage the massive fleets of physical machines that host our virtualized environments is becoming increasingly critical. While the cloud offers abstraction and on-demand scaling, the reality is that millions of physical servers, networked and orchestrated with precision, form the bedrock of these seemingly limitless resources. One of the key technologies that enables the rapid provisioning of these servers is the Preboot Execution Environment (PXE).

    Unattended Setups and Network Booting: An Introduction to PXE

    PXE provides a standardized environment for computers to boot directly from a network interface, independent of any local storage devices or operating systems. This capability is fundamental for achieving unattended installations on a massive scale. The PXE boot process is a series of network interactions that allow a bare-metal machine to discover boot servers, download an initial program into its memory, and begin the installation or recovery process.

    The Technical Details of How PXE Works

    The PXE boot process is a series of choreographed steps involving several key components and network protocols:

    Discovery

    When a PXE-enabled computer is powered on, its firmware broadcasts a special DHCPDISCOVER packet that is extended with PXE-specific options. This packet is sent to port 67/UDP, the standard DHCP server port.

    Proxy DHCP

    A PXE redirection service (or Proxy DHCP) is a key component. If a Proxy DHCP receives an extended DHCPDISCOVER, it responds with an extended DHCPOFFER packet, which is broadcast to port 68/UDP. This offer contains critical information, including:

    • A PXE Discovery Control field to determine if the client should use Multicasting, Broadcasting, or Unicasting to contact boot servers.
    • A list of IP addresses for available PXE Boot Servers.
    • A PXE Boot Menu with options for different boot server types.
    • A PXE Boot Prompt (e.g., “Press F8 for boot menu”) and a timeout.
    • The Proxy DHCP service can run on the same host as a standard DHCP service but on a different port (4011/UDP) to avoid conflicts.

    Boot Server Interaction

    The PXE client, now aware of its boot server options, chooses a boot server and sends an extended DHCPREQUEST packet, typically to port 4011/UDP or broadcasting to 67/UDP. This request specifies the desired PXE Boot Server Type.

    Acknowledgement

    The PXE Boot Server, if configured for the client’s requested boot type, responds with an extended DHCPACK. This packet is crucial as it contains the complete file path for the Network Bootstrap Program (NBP) to be downloaded via TFTP (Trivial File Transfer Protocol).

    Execution

    The client downloads the NBP into its RAM using TFTP. Once downloaded and verified, the PXE firmware executes the NBP. The functions of the NBP are not defined by the PXE specification, allowing it to perform various tasks, from presenting a boot menu to initiating a fully automated operating system installation.

      The Role of PXE in Modern Hyperscale Infrastructure

      While PXE has existed for years, its importance in the era of hyperscale cloud computing is greater than ever. In environments where millions of physical machines need to be deployed and managed, PXE is the first and most critical step in an automated provisioning pipeline. It enables:

      • Rapid Provisioning: Automating the initial boot process allows cloud providers to provision thousands of new servers simultaneously, dramatically reducing deployment time.
      • Standardized Deployment: PXE ensures a consistent starting point for every machine, allowing for standardized operating system images and configurations to be applied fleet-wide.
      • Remote Management and Recovery: PXE provides a reliable way to boot machines into diagnostic or recovery environments without requiring physical access, which is essential for managing geographically distributed data centers.

      Connecting the Virtual to the Physica

      For new engineers, understanding the role of technologies like PXE bridges the gap between the virtual world of cloud computing and the bare-metal reality of the hardware that supports it. This knowledge is not just historical; it is a foundation for:

      • Designing Resilient Systems: Understanding the underlying infrastructure informs the design of more scalable and fault-tolerant cloud-native applications.
      • Effective Troubleshooting: When issues arise in a virtualized environment, knowing the physical layer can be crucial for diagnosing and resolving problems.
      • Building Infrastructure as Code: The principles of automating physical infrastructure deployment are directly applicable to the modern practice of Infrastructure as Code (IaC).

      By appreciating the intricacies of building and managing the physical infrastructure, engineers can build more robust, efficient, and truly cloud-native solutions, ensuring they have a complete picture of the technology stack from the bare metal to the application layer.

    1. RPi – Static IP Address on Wifi

      There is a GUI tool in the desktop called “wpa_gui” which can be used to connect to the wireless network provided you have a supported wireless card attached to the RPi. However, if I want to run a headless RPi I would need a static IP address. Unfortunately “wpa_gui” does not provide me a means of configuring static IP address on the “wan0″ interface and my ADSL router does not support associating a static IP address with a MAC Address. This means I have to use static IP address configured on my wireless interface on the RPi and have to do it the old fashioned way (read I am loving it).

      Open up the “/etc/network/interfaces” file and make the following entries. The commented lines are the one’s which were added by the “wpa_gui” and we don’t need them. If you have little Debian experience, you will find these lines self explanatory:

      auto lo
      iface lo inet loopback
      
      #auto eth0
      iface eth0 inet static
      address eth0 192.168.1.52
      netmask 255.255.255.0
      gateway 192.168.1.1
      
      auto wlan0
      allow-hotplug wlan0
      iface wlan0 inet static
      address 192.168.1.51
      netmask 255.255.255.0
      gateway 192.168.1.1
      wpa-ssid "My SSID"
      wpa-passphrase "My Passphrase"

      I have added a static IP address configuration line for the eth0 interface also, so that in case someday I connect my RPi to physical connection I will just bring my eth0 interface up and have an IP address. The reason I have commented the “auto eth0” line is because in case a physical interface is up, the default route of the system is always through the physical interface i.e eth0 in this case. So, if my WiFi is up, I want my packets to go in/out through WiFi by default and not through “eth0” (by the way it does not matter if you have connected the cable physically or not, if the physical interface is up, it is the default route out). Of-course we can prevent that, but it is going to be a little bit complicated, so we are going to just comment out auto line to make sure that the “eth0” does not come up. It is also possible to have both “eth0” and “wlan0” run simultaneously, but again it is a bit complicated for this post and I do not need that anyway.

      Now you can restart the networking or reboot the RPi and your WiFi should come up with the static IP address.

    2. Creating VPNs with OpenVPN

      Introduction

      A VPN is a set of tools which allow networks at different locations to be securely connected, using a public network as the transport layer. A VPN produces a virtual “dedicated circuit” over the internet and use cryptography to secure it.
      (more…)

    3. Changing the IP Address of a Solaris System

      Use ifconfig to change the IP address immediately

      ifconfig    

      If the new IP address calls for a different gateway then change it using the route command:

      route add default 
      route del default 
       

      Change the hosts’s IP address in

      • /etc/hosts file to take effect after each reboot
      • /etc/inet/ipnodes (for Solaris 10)

      Change the host’s subnet mask in /etc/netmask

      Change the host’s default gateway in /etc/defaultrouter