Have you ever started a new Python project and, within a week, everything already feels messy?
Your config.py file is slowly becoming a dumping ground. There are commented lines everywhere, database URLs hardcoded directly in the file, and if ENV == “prod” conditions scattered across the codebase. At first, it feels manageable. But very quickly, it becomes difficult to understand what is actually being used and what is not.
And somewhere in the back of your mind, there is always that small fear: What if I accidentally expose a production password or push the wrong configuration?
This kind of setup might work for a small script. But as the project grows, it becomes hard to maintain and almost impossible to scale properly. And yes, this still happens even in the modern world of AI-assisted coding, irrespective of which model we use.
Over time, I realized that the cleanest way to handle configuration is not through complex .ini files or deeply nested dictionaries. I prefer using Python class inheritance along with environment variables. In some projects, I also pair this with Pydantic for validation when things get more complex.
Here’s how I structure my configuration systems to keep them type-safe, secure, and, most importantly, easy to read.
The Foundation
First, we need to talk about secrets. Hardcoding a Telegram token inside your code is basically inviting trouble. The simplest solution is to move sensitive values into a .env file and load them from environment variables.
One important rule. Never commit your .env file to Git. Instead, keep a .env.example file with empty placeholders so your team knows what variables are required.
This class holds the defaults. Everything common lives here. No duplication.
When I need environment-specific behavior, I simply inherit and override only what is required.
For example, in end-to-end testing, I might want notifications enabled but routed differently.
class E2EConfig(Config):
    """Overrides for E2E testing"""
    TESTING = True
    TELEGRAM_SEND_NOTIFICATIONS = True
    E2E_NOTIFICATION_BOT = 'Admin Bot'
For unit or integration testing, I definitely do not want real Telegram messages going out. I also prefer an in-memory database for speed.
class TestConfig(Config):
    """Overrides for local unit tests"""
    TESTING = True
    SQLALCHEMY_DATABASE_URI = 'sqlite:///:memory:'  # Use in-memory DB for speed
    TELEGRAM_SEND_NOTIFICATIONS = False
    WTF_CSRF_ENABLED = False
Notice something important here. I am not copying the entire base class. I am only overriding what changes. That alone reduces many future mistakes.
To avoid magic strings floating around in the logic layer, I sometimes pair this with enums.
from enum import Enum

class LogType(Enum):
    STREAM_PUBLISH = 'STREAM_PUBLISH'
    NOTIFICATION = 'NOTIFICATION'
Now my IDE knows the valid options. Refactoring becomes safer. Typos become less likely.
Loading the configuration is also simple. In Flask, I usually use a factory pattern and switch based on one environment variable.
import os from flask import Flask from config import Config, E2EConfig, TestConfig
def create_app(): app = Flask(__name__)
# Select config based on APP_ENV environment variable env = os.environ.get("APP_ENV", "production").lower()
# Load the selected class app.config.from_object(configs.get(env, Config))
return app
That is it. One variable controls everything. No scattered if-else checks across the codebase.
Over time, this pattern has saved me from configuration-related surprises. All settings live in one place. Inheritance avoids copy-paste errors. Tests do not accidentally spam users because TELEGRAM_SEND_NOTIFICATIONS is explicitly set to False in TestConfig.
And if tomorrow I need a StagingConfig or DevConfig, I just add a small class that extends Config. Three or four lines, and I am done.
Configuration management may not be glamorous, but it decides how stable your application feels in the long run. A clean structure here reduces mental load everywhere else.
In Ansible, the “Flat Namespace” problem is a frequent stumbling block for engineers managing multi-tier environments. It occurs because Ansible merges variables from various sources (global, group, and host) into a single pool for the current execution context.
If you aren’t careful, trying to use a variable meant for “Group A” while executing tasks on “Group B” will cause the play to crash because that variable simply doesn’t exist in Group B’s scope.
The Scenario: The “Mixed Fleet” Crash
Imagine you are managing a fleet of Web Servers (running on port 8080) and Database Servers (running on port 5432). You want a single “Security” play to validate that the application port is open in the firewall.
The Failing Code:
- name: Apply Security Rules
  hosts: web:database
  vars:
    # This is the "Flat Namespace" trap!
    # Ansible tries to resolve BOTH variables for every host.
    app_port_map:
      web_servers: "{{ web_custom_port }}"
      db_servers: "{{ db_instance_port }}"

  tasks:
    - name: Validate port is defined
      ansible.builtin.assert:
        that: app_port_map[group_names[0]] is defined
This code fails when Ansible runs this for a web_server, it looks at app_port_map. To build that dictionary, it must resolve db_instance_port. But since the host is a web server, the database group variables aren’t loaded. Result: fatal: 'db_instance_port' is undefined.
Solution 1: The “Lazy” Logic
By using Jinja2 whitespace control and conditional logic, we prevent Ansible from ever looking at the missing variable. It only evaluates the branch that matches the host’s group.
- name: Apply Security Rules
  hosts: app_servers:storage_servers
  vars:
    # Use whitespace-controlled Jinja to isolate variable calls
    target_port: >-
      {%- if 'app_servers' in group_names -%}
        {{ app_service_port }}
      {%- elif 'storage_servers' in group_names -%}
        {{ storage_backend_port }}
      {%- else -%}
        22
      {%- endif -%}

  tasks:
    - name: Ensure port is allowed in firewall
      community.general.ufw:
        rule: allow
        port: "{{ target_port | int }}"
The advantage of this approach is that it’s very explicit, prevents “Undefined Variable” errors entirely, and allows for easy defaults. However, it can become verbose/messy if you have a large number of different groups.
Solution 2: The hostvars Lookup
If you don’t want a giant if/else block, you can use hostvars to dynamically grab a value, but you must provide a default to keep the namespace “safe.”
This approach is very compact and follows a naming convention (e.g., groupname_port). But its harder to debug and relies on strict variable naming across your entire inventory.
Solution 3: Group Variable Normalization
The most “architecturally sound” way to solve the flat namespace problem is to use the same variable name across different group_vars files.
# Playbook - main.yml
---
- name: Unified Firewall Play
  hosts: all
  tasks:
    - name: Open service port
      community.general.ufw:
        port: "{{ service_port }}" # No logic needed!
        rule: allow
This is the cleanest playbook code; truly “Ansible-native” way of handling polymorphism but it requires refactoring your existing variable names and can be confusing if you need to see both ports at once (e.g., in a Load Balancer config).
The “Flat Namespace” problem is really just a symptom of Ansible’s strength: it’s trying to make sure everything you’ve defined is valid. I recently solved this problem in a multi-play playbook, which I wrote for Digital Ocean infrastructure provisioning and configuration using the Lazy Logic approach, and I found this to be the best way to bridge the gap between “Group A” and “Group B” without forcing a massive inventory refactor. While I have generalized the example code, I actually faced this problem in a play that set up the host-level firewall based on dynamic inventory.
In today’s cloud-centric world, where virtual machines and containers seem to materialize on demand, it’s easy to overlook the physical infrastructure that makes it all possible. For the new generation of engineers, a deeper understanding of what it takes to build and manage the massive fleets of physical machines that host our virtualized environments is becoming increasingly critical. While the cloud offers abstraction and on-demand scaling, the reality is that millions of physical servers, networked and orchestrated with precision, form the bedrock of these seemingly limitless resources. One of the key technologies that enables the rapid provisioning of these servers is the Preboot Execution Environment (PXE).
Unattended Setups and Network Booting: An Introduction to PXE
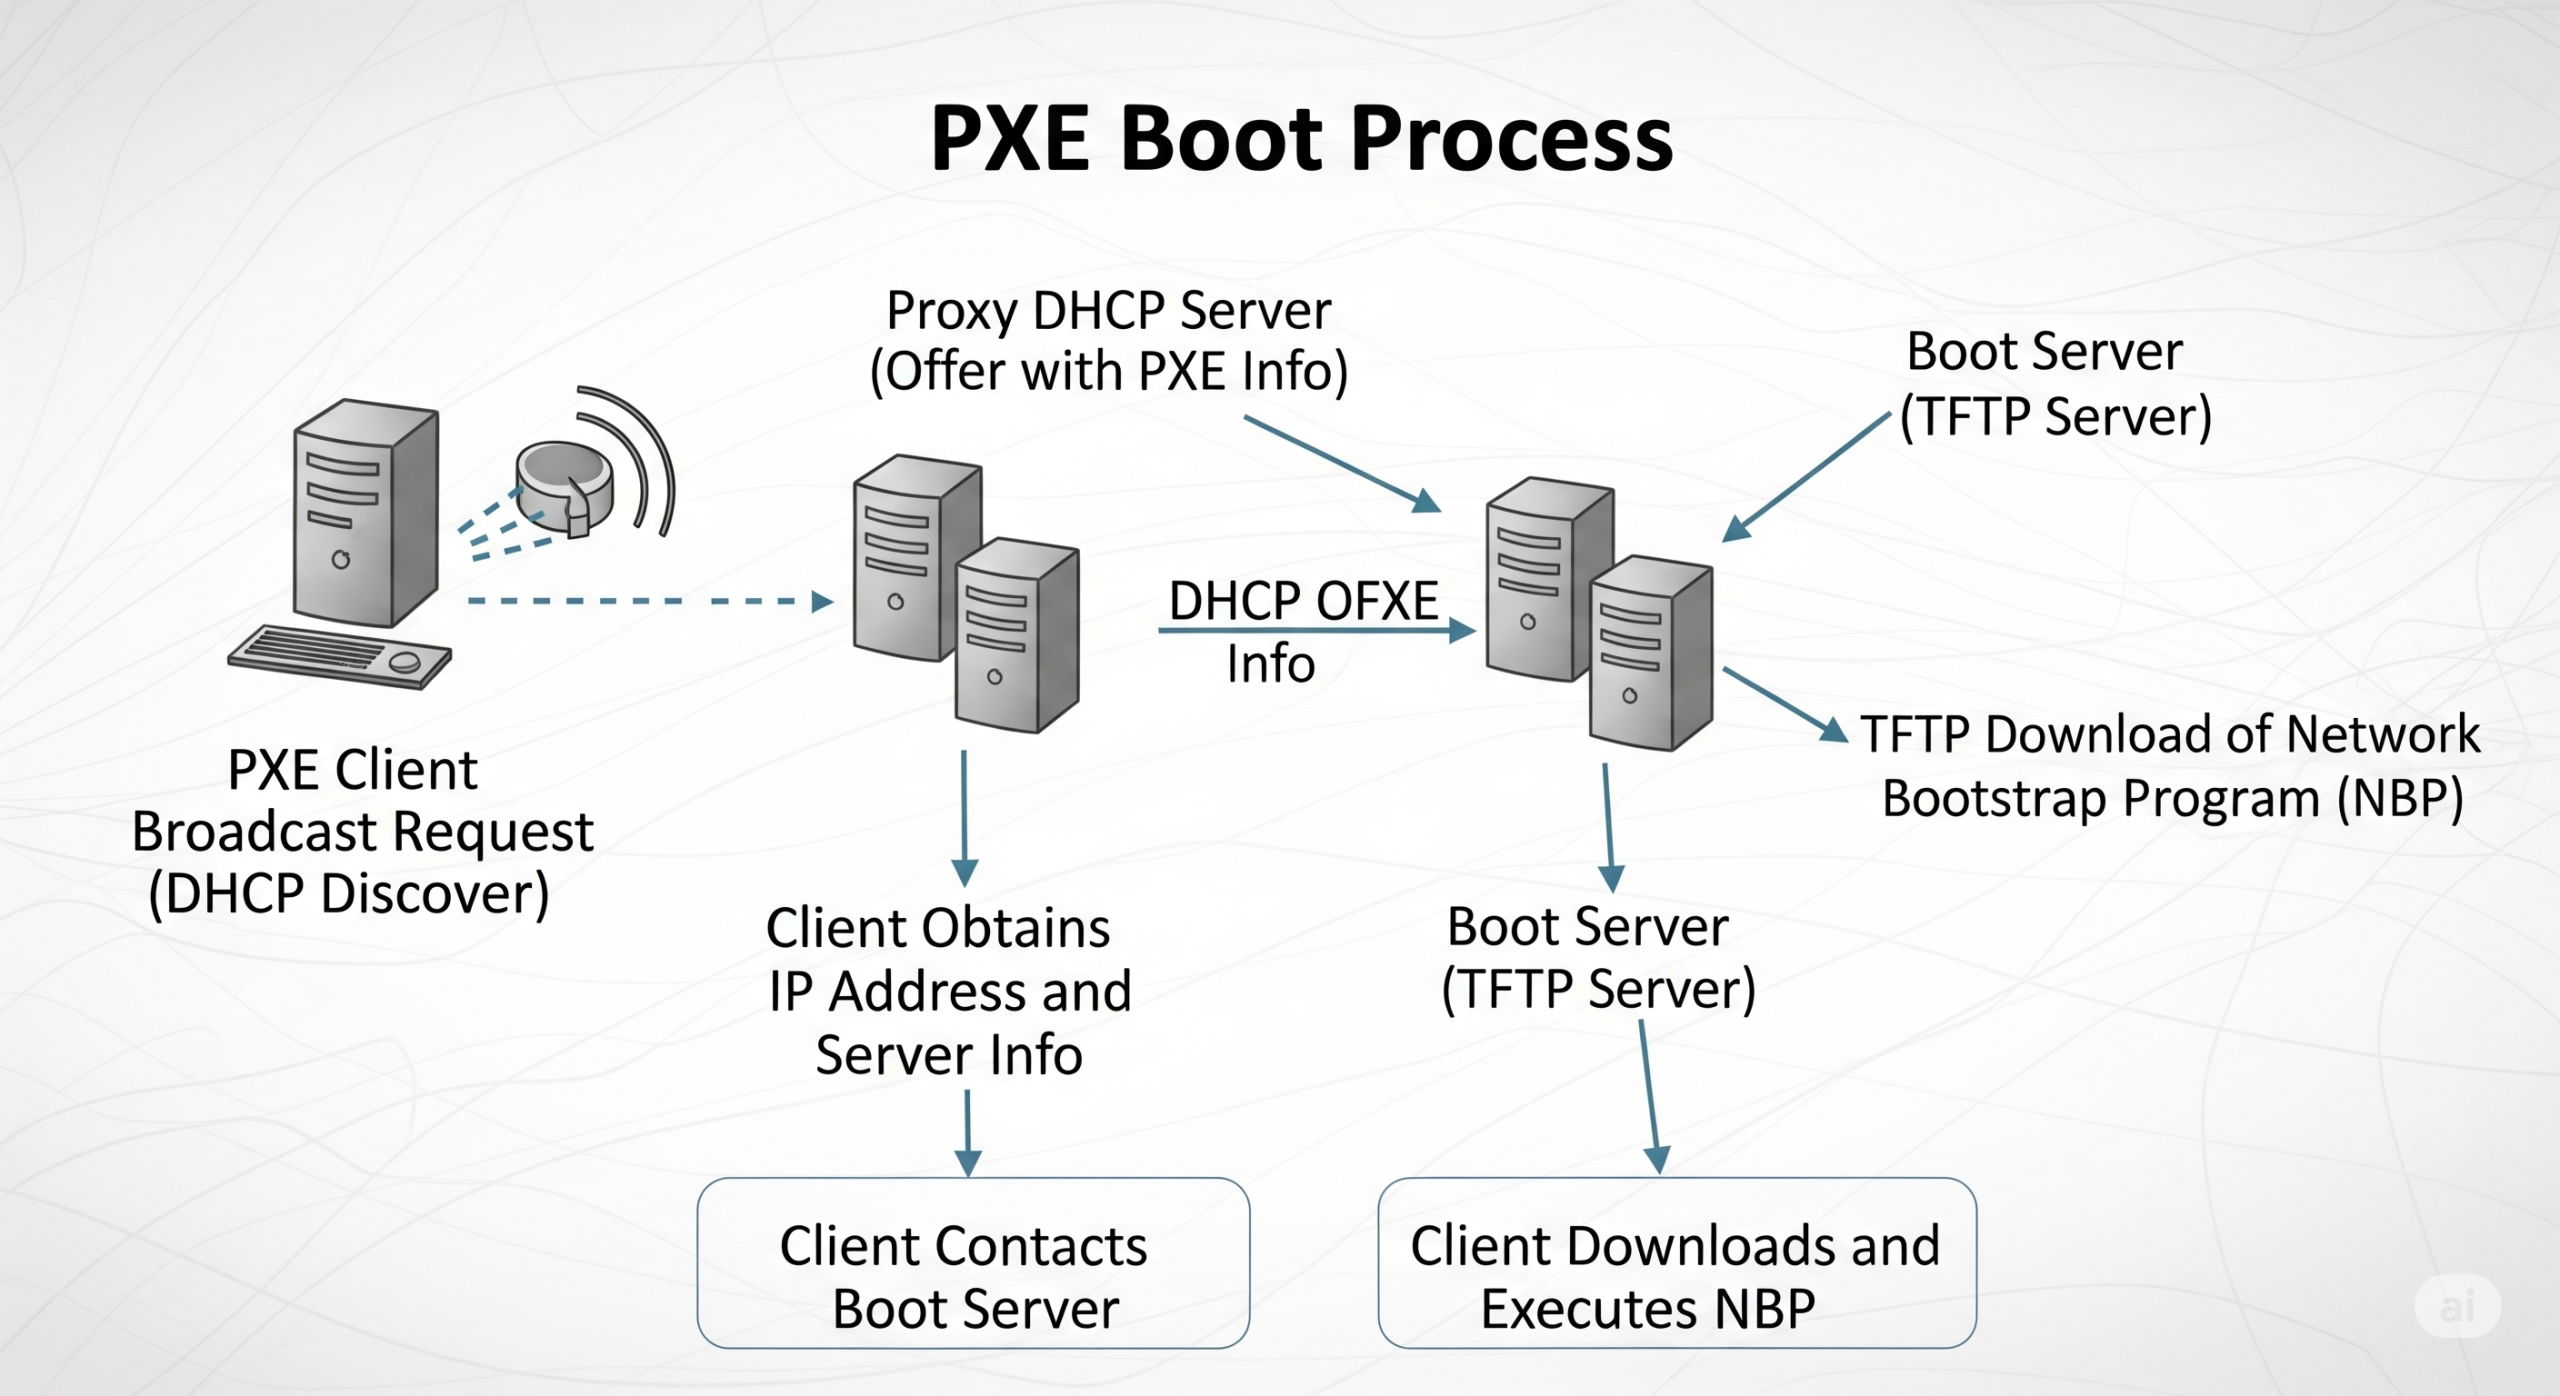
PXE provides a standardized environment for computers to boot directly from a network interface, independent of any local storage devices or operating systems. This capability is fundamental for achieving unattended installations on a massive scale. The PXE boot process is a series of network interactions that allow a bare-metal machine to discover boot servers, download an initial program into its memory, and begin the installation or recovery process.
The Technical Details of How PXE Works
The PXE boot process is a series of choreographed steps involving several key components and network protocols:
Discovery
When a PXE-enabled computer is powered on, its firmware broadcasts a special DHCPDISCOVER packet that is extended with PXE-specific options. This packet is sent to port 67/UDP, the standard DHCP server port.
Proxy DHCP
A PXE redirection service (or Proxy DHCP) is a key component. If a Proxy DHCP receives an extended DHCPDISCOVER, it responds with an extended DHCPOFFER packet, which is broadcast to port 68/UDP. This offer contains critical information, including:
A PXE Discovery Control field to determine if the client should use Multicasting, Broadcasting, or Unicasting to contact boot servers.
A list of IP addresses for available PXE Boot Servers.
A PXE Boot Menu with options for different boot server types.
A PXE Boot Prompt (e.g., “Press F8 for boot menu”) and a timeout.
The Proxy DHCP service can run on the same host as a standard DHCP service but on a different port (4011/UDP) to avoid conflicts.
Boot Server Interaction
The PXE client, now aware of its boot server options, chooses a boot server and sends an extended DHCPREQUEST packet, typically to port 4011/UDP or broadcasting to 67/UDP. This request specifies the desired PXE Boot Server Type.
Acknowledgement
The PXE Boot Server, if configured for the client’s requested boot type, responds with an extended DHCPACK. This packet is crucial as it contains the complete file path for the Network Bootstrap Program (NBP) to be downloaded via TFTP (Trivial File Transfer Protocol).
Execution
The client downloads the NBP into its RAM using TFTP. Once downloaded and verified, the PXE firmware executes the NBP. The functions of the NBP are not defined by the PXE specification, allowing it to perform various tasks, from presenting a boot menu to initiating a fully automated operating system installation.
The Role of PXE in Modern Hyperscale Infrastructure
While PXE has existed for years, its importance in the era of hyperscale cloud computing is greater than ever. In environments where millions of physical machines need to be deployed and managed, PXE is the first and most critical step in an automated provisioning pipeline. It enables:
Rapid Provisioning: Automating the initial boot process allows cloud providers to provision thousands of new servers simultaneously, dramatically reducing deployment time.
Standardized Deployment: PXE ensures a consistent starting point for every machine, allowing for standardized operating system images and configurations to be applied fleet-wide.
Remote Management and Recovery: PXE provides a reliable way to boot machines into diagnostic or recovery environments without requiring physical access, which is essential for managing geographically distributed data centers.
Connecting the Virtual to the Physica
For new engineers, understanding the role of technologies like PXE bridges the gap between the virtual world of cloud computing and the bare-metal reality of the hardware that supports it. This knowledge is not just historical; it is a foundation for:
Designing Resilient Systems: Understanding the underlying infrastructure informs the design of more scalable and fault-tolerant cloud-native applications.
Effective Troubleshooting: When issues arise in a virtualized environment, knowing the physical layer can be crucial for diagnosing and resolving problems.
Building Infrastructure as Code: The principles of automating physical infrastructure deployment are directly applicable to the modern practice of Infrastructure as Code (IaC).
By appreciating the intricacies of building and managing the physical infrastructure, engineers can build more robust, efficient, and truly cloud-native solutions, ensuring they have a complete picture of the technology stack from the bare metal to the application layer.
While trying to figure out an error, I found the following line in one of the crontab files and I could not stop myself from smiling.
PATH=$PATH:/opt/mysoftware/bin
And that single line perfectly encapsulated the misconception I want to address today: No, a crontab is NOT a shell script!
It’s a common trap many of us fall into, especially when we’re first dabbling with scheduling tasks on Linux/Unix systems. We’re used to the shell environment, where scripts are king, and we naturally assume crontab operates under the same rules. But as that PATH line subtly hints, there’s a fundamental difference.
The Illusion of Simplicity: What a Crontab Looks Like
At first glance, a crontab file seems like it could be a script. You define commands, specify execution times, and often see environmental variables being set, just like in a shell script. Here’s a typical entry:
0 2 * * * /usr/bin/some_daily_backup.sh
This tells cron to run /usr/bin/some_daily_backup.sh every day at 2:00 AM. Looks like a command in a script, right? But the key difference lies in how that command is executed.
Why Crontab is NOT a Shell Script: The Environment Gap
The critical distinction is this: When cron executes a job, it does so in a minimal, non-interactive shell environment. This environment is significantly different from your interactive login shell (like Bash, Zsh, or even a typical non-login shell script execution).
Let me break down the implications, and why that PATH line I discovered was so telling:
Limited PATH
This is perhaps the most frequent culprit for “my cron job isn’t working!” errors. Your interactive shell has a PATH variable populated with directories where executables are commonly found (e.g., /usr/local/bin, /usr/bin, /bin). The default PATH for cron jobs is often severely restricted, sometimes just to /usr/bin:/bin.
This means if your script or command relies on an executable located outside of cron’s default PATH (like /opt/mysoftware/bin/mycommand), it simply won’t be found, and the job will fail. That’s why the PATH=$PATH:/opt/mysoftware/bin line was necessary – it explicitly tells cron where to look for executables for that specific job.
Minimal Environment Variables
Beyond PATH, most other environment variables you rely on in your interactive shell (like HOME, LANG, TERM, or custom variables you’ve set in your .bashrc or .profile) are often not present or have very basic values in the cron environment.
Consider a script that needs to know your HOME directory to find configuration files. If your cron job simply calls this script without explicitly setting HOME, the script might fail because it can’t locate its resources.
No Interactive Features
Cron jobs run non-interactively. This means:
No terminal attached.
No user input (prompts, read commands, etc.).
No fancy terminal features (like colors or cursor manipulation).
No aliases or shell functions defined in your dotfiles.
If your script assumes any of these, it will likely behave unexpectedly or fail when run by cron.
Specific Shell Invocation
While you can specify the shell to be used for executing cron commands (often done with SHELL=/bin/bash at the top of the crontab file), even then, that shell is invoked in a non-login, non-interactive mode. This means it won’t necessarily read your personal shell configuration files (.bashrc, .profile, .zshrc, etc.) unless explicitly sourced.
The “Lot of Information” Cron Needs: Practical Examples
So, if crontab isn’t a shell script, what “information” does it need to operate effectively in this minimalist shell? It needs explicit instructions for everything you take for granted in your interactive session.
Let’s look at some common “incorrect” entries, what people expected, and how they should be corrected.
Example 1: Missing the PATH
The incorrect entry would look something like below:
0 * * * * my_custom_command
The user expected here was, “I want my_custom_command to run every hour. It works perfectly when I type it in my terminal.”
The my_custom_command is likely located in a directory that’s part of the user’s interactive PATH (e.g., /usr/local/bin/my_custom_command or /opt/mysoftware/bin/my_custom_command). However, cron’s default PATH is usually minimal (/usr/bin:/bin), so it cannot find my_custom_command. The error usually manifests as a “command not found” message mailed to the cron user or present in the syslog.
The fix here would be to always use the full, absolute path to your executables as shown in the below sample entry:
0 * * * * /usr/local/bin/my_custom_command
Or, if multiple commands from that path are used, you can set the PATH at the top of the crontab:
PATH=/usr/local/bin:/usr/bin:/bin # Add other directories as needed
0 * * * * my_custom_command
Example 2: Relying on Aliases or Shell Functions
The incorrect entry would look like below:
@reboot myalias_cleanup
The user assumed that, “I have an alias myalias_cleanup='rm -rf /tmp/my_cache/*' defined in my .bashrc. I want this cleanup to run every time the system reboots.”
But the aliases and shell functions are defined within your interactive shell’s configuration files (.bashrc, .zshrc, etc.). Cron does not source these files by default when executing jobs. Therefore, myalias_cleanup is undefined in the cron environment, leading to a “command not found” error.
The correct thing would be to replace aliases or shell functions with the actual commands or create a dedicated script.
# If myalias_cleanup was 'rm -rf /tmp/my_cache/*'
@reboot /bin/rm -rf /tmp/my_cache/*
Or, if it’s a complex set of commands, put them into a standalone script and call that script:
# In /usr/local/bin/my_cleanup_script.sh:
#!/bin/bash
/bin/rm -rf /tmp/my_cache/*
# ... more commands

# In crontab:
@reboot /usr/local/bin/my_cleanup_script.sh
Example 3: Assuming User-Specific Environment Variables
The user expected here that, “I have export MY_API_KEY='xyz123' in my .profile. I want my script to run daily using this API key.”
This assumption is wrong as similar to aliases, cron does not load your .profile or other user-specific environment variable files. The MY_API_KEY variable will be undefined in the cron environment, causing the curl command to fail (e.g., “authentication failed” or an empty key parameter).
To fix this explicitly set required environment variables within the crontab entry or directly within the script. There are two possible options to do this:
Option A: In Crontab (good for a few variables specific to the cron job):
The user expected that, “My Django application lives in /home/user/my_app. When I’m in /home/user/my_app and run python manage.py cleanup_old_data, it works. I want this to run nightly.”
Again, this assumption is incorrect as when cron executes a job, the current working directory is typically the user’s home directory (~). So, cron would look for my_app/manage.py inside ~/my_app/manage.py, not /home/user/my_app/manage.py. This leads to “file not found” errors.
To fix this either use absolute paths for the script or explicitly change the directory before executing. Here are the examples using two possible options:
Note the && which ensures the python command only runs if the cd command is successful.
Example 5: Output Flooding and Debugging
To illustrate this case, look at the following incorrect example entry:
*/5 * * * * /usr/local/bin/my_chatty_script.sh
The user expected that, “I want my_chatty_script.sh to run every 5 minutes.”
This expectation is totally baseless as by default, cron mails any standard output (stdout) or standard error (stderr) from a job to the crontab owner. If my_chatty_script.sh produces a lot of output, it will quickly fill up the user’s mailbox, potentially causing disk space issues or overwhelming the mail server. While not a “failure” of the job itself, it’s a major operational oversight.
The correct way is to redirect output to a log file or /dev/null for production jobs.
Redirect to a log file (recommended for debugging and auditing):
The smile I had when I saw that PATH line in a crontab file was the smile of recognition – recognition of a fundamental operational truth. Crontab is a scheduler, a timekeeper, an orchestrator of tasks. It’s not a shell interpreter.
Understanding this distinction is crucial for debugging cron job failures and writing robust, reliable automated tasks. Always remember: when cron runs your command, it’s in a stark, bare-bones environment. You, the administrator (or developer), are responsible for providing all the context and information your command or script needs to execute successfully.
So next time you’re troubleshooting a cron job, don’t immediately blame the script. First, ask yourself: “Does this script have all the information and the right environment to run in the minimalist world of cron?” More often than not, the answer lies there.
Telegram is a cloud based messaging application which provides an excellent set of APIs to allow developers to automate on top of the platform. It is increasingly being used to automate various notifications and messages. It has become a platform of choice to create bots which interact with users and groups.
Telethon is an asyncio Python 3 library for interacting with telegram API. It is one of the very exhaustive libraries which allows users to interact with telegram API as a user or as a bot.
Recently I have written some AWS Lambda functions to automate certain personal notifications. I could have run the code as a container on one of my VPSs or on Hulu or other platforms, but I took this exercise as an opportunity to learn more about serverless and functions. Also, my kind of load is something which can easyly fall under the Lambda free tier.
In this post we will look into the process of how to start with the development and write some basic python applications.
Registering As a Telegram Developer
Following steps can be followed to obtain the API ID for telegram –
Sign up for Telegram using any application
Login to the https://my.telegram.org/ website using the same mobile number. Telegram will send you a confirmation code on Telegram application. After entering the confirmation code, you will be seeing the following screen –
In the above screen select the API Development Tools and complete the form. This page will provide some basic information in addition to api_id and api_hash.
Setting up Telethon Development Environment
I assume that the reader is familiar with basic python and knows how to set up a virtual environment, so rather than explaining, I would more focus on quick code to get the development environment up and running.
I will be using .env file for storing the api_id and api_hash so that the same can be used in the code which we will write. Replace NNNNN with your api_id and XX with your api_hash
Next we will need to create a session to be used in our code. For full automation, it is needed that we store the session either as a file or as a string. Since the cloud environments destroy the ephimeral storage they provide, so I will get the session as a string. The following python code will help obtain the same.
#! /usr/bin/env python3

import os

from dotenv import load_dotenv

from telethon.sync import TelegramClient
from telethon.sessions import StringSession

load_dotenv()

with TelegramClient(StringSession(), os.getenv("TELEGRAM_API_ID"), os.getenv("TELEGRAM_API_HASH")) as client:
    print(client.session.save())
When this code is executed, it will prompt for your phone number. Here you would need to print the phone number with the country code. In the next step, an authorization code will be received in the telegram application which would need to be entered in the application prompt. Once the authorization code is typed correctly, the session will be printed as a string value on standard output. You would need to save the same.
(venv-telethon) $ ./get_string_session.py
 Please enter your phone (or bot token): +91xxxxxxxxxx
 Please enter the code you received: zzzzz
Signed in successfully as KKKKKK KKKKKKK
9vznqQDuX2q34Fyir634qgDysl4gZ4Fhu82eZ9yHs35rKyXf9vznqQDuX2q34Fyir634qgDyslLov-S0t7KpTK6q6EdEnla7cqGD26N5uHg9rFtg83J8t2l5TlStCsuhWjdzbb29MFFSU5-l4gZ4Fhu9vznqQDuX2q34Fyir634qgDysl9vznqQDuX2q34Fyir634qgDy_x7Sr9lFgZsH99aOD35nSqw3RzBmm51EUIeKhG4hNeHuF1nwzttuBGQqqqfao8sTB5_purgT-hAd2prYJDBcavzH8igqk5KDCTsZVLVFIV32a9Odfvzg2MlnGRud64-S0t7KpTK6q6EdEnla7cqGD26N5uHg9rFtg83J8t2l5TlStCsuhWjdzbb29MFFSU5=
I normally put the string session along with the API ID and Hash in the .env file. All these three values would need to be protected and should never be shared with a third party.
For the next code, I will assume that you have used a variable TELEGRAM_STRING_SESSION. So the final .env file will look like below –
Now we have the ground work done, so we will write a simple python application to send a message to a contact. The important point to note here is that the recipient must be in your telegram contacts.
#! /usr/bin/env python3

import os

from telethon.sync import TelegramClient
from telethon.sessions import StringSession
from dotenv import load_dotenv

load_dotenv()

try:
    client = TelegramClient(StringSession(os.getenv("STRING_TOKEN")), os.getenv("API_ID"), os.getenv("API_HASH"))
    client.start()
except Exception as e:
    print(f"Exception while starting the client - {e}")
else:
    print("Client started")

async def main():
    try:
        # Replace the xxxxx in the following line with the full international mobile number of the contact
        # In place of mobile number you can use the telegram user id of the contact if you know
        ret_value = await client.send_message("xxxxxxxxxxx", 'Hi')
    except Exception as e:
        print(f"Exception while sending the message - {e}")
    else:
        print(f"Message sent. Return Value {ret_value}")

with client:
    client.loop.run_until_complete(main())
Next Steps
The telethon API is quite versatile, a detailed API documentation can be find at https://tl.telethon.dev/. Hope this post will help the reader quickly start off with the telegram messaging with telethon module.